ViewPLUS SCADA Server
Overview
The server software must be associated with a project in order to be able to run. When run from the Editor menu, the currently open project is used by the server. To run the server independently from the editor, select "Editor > Select Tools > Create Server Files to specify a folder and copy the server files to this folder. The "ServerEngine" script is used to launch the server. The "ServerEngine" script looks for a folder named "Project" in the same folder as the default behavior.
The "Project" folder contains special files created by the editor. The main ones are; "MicrodevScada.ini", "Project.zip", "project pages with .sca extension", and component files. The server reads the information in the "MikrodevScada.ini" file, such as where to connect to the database and where to keep the records.
When the SCADA server is started for the first time, the user may be prompted to enter the database connection information. The server can open a project in a different folder by using command line parameters below.
“ServerEngine –dir “C:\Users\yg\Desktop\server\projectname“ ”
-dir : Project folder
Server Home Screen
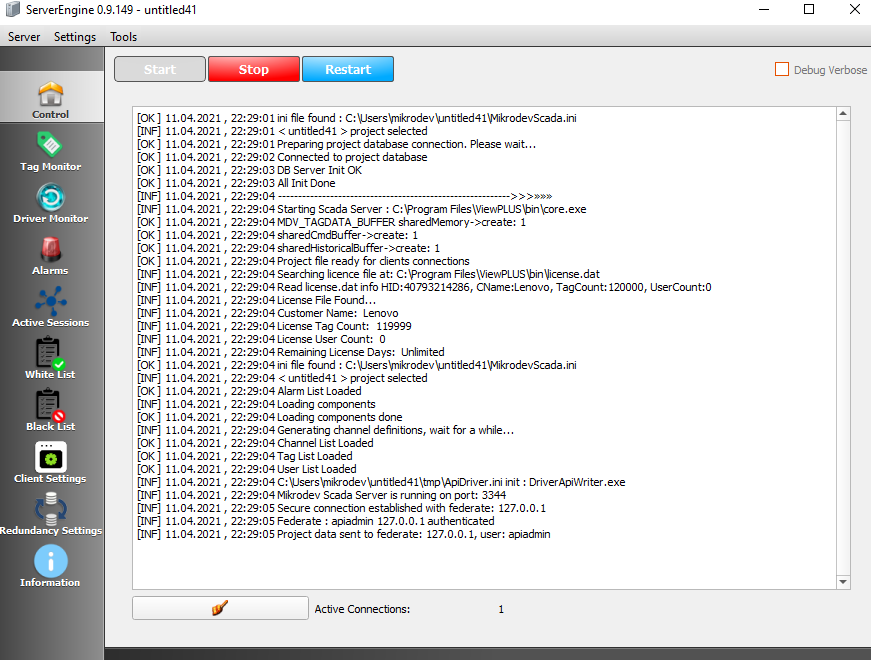
The main screen of the server has a console on which general system logs can be viewed. This console shows important server changes. More detailed server logs are saved in a separate file. When the "Start" button is pressed, the server tries to connect to the field devices. After the connection is established, the server opens a port to which clients can connect and waits for incoming connections. When the server starts reading data from the field, it records them on the database server as specified in the project settings. Instantaneous readings of field-readable data can be viewed on the tag monitoring screen.
Server Tag Monitor Screen
The instantaneous values on the tag monitoring screen can be filtered according to parameters such as tagID, tag name, channel name, device address.
If there is a text "dced" next to the numeric data shown in the "Value" field, this indicates a connection problem between the device and the SCADA server
Information about the protocol drivers running on the drive monitoring screen is given. Information about connection problems can be obtained from this console.
The alarm screen allows you to observe the history of alarms generated in the system and the current alarms.
Server Auto Start
Windows Platform
Follow these steps to start the server automatically (for a sample project named "TestProject"):
Create a shortcut on the desktop for the "ServerEngine.exe" program in the installation folder of ViewPLUS. Shortcut Creation
Right-click the created shortcut and select "Properties". Change the field marked "Target" to the following (Change the file path according to your system):
C:\Users\<User Name>\TestProject" -start C:\Program Files (x86)\ViewPLUS\bin\ServerEngine.exe"
Then copy this shortcut to
"C:\Users\<User Name>\AppData\Roaming\Microsoft\Windows\Start Menu\Programs\Startup"
The server will now start automatically when the user logs in to the system.
Auto startup can be accomplished by copying the OperatorClient shortcut to
"C:\Users\<User Name>\AppData\ Roaming\Microsoft\Windows\Start Menu\Programs\Startup"
Email Server Settings
E-mail can be sent in case of an alarm to the user whose "e-mail send option" is marked as active from the user manager. For this, e-mail configuration settings must be made on the server. In addition, the smtp server to be used should allow "less secure application access". The configuration file "ServerEngine.ini" where the e-mail server settings can be found in the following folder:
C:\Users\<user name>\AppData\Roaming\Mikrodev\ScadaServer\<project name>\ServerEngine.ini
In this file, the following variables must be set correctly under [SMTP]:
[SMTP]
SMTP_user =<email username>
SMTP_pwd=<e-mail password>
SMTP_host=<smtp server address>
SMTP_port=<smtp server port>
SMTP_mailDelay=<The time (in seconds) to wait for an e-mail to be sent after an alarm condition(in seconds)>
Create Server Runtime
You can also run the developed SCADA project without installing ViewPLUS on a different computer. By selecting "Create Server Files" from the "Tools" menu for this, you can collect the files in a folder for project and server work. By moving this folder, it is possible to run your project on different server machines.
Advanced Settings
log_server.txt:
On Windows systems, it is located in the following folder:   C:\Users\<username>\AppData\Roaming\Mikrodev\ScadaServer\<project name>
It is the file where the detailed server logs are found
log_serverstarter.txt :
The file that contains logs of the server monitor software
OperatorClient.ini :
ServerEngine.ini:
On Windows systems, it is located in the following folder:
C:\Users\<user name>\AppData\Mikrodev\ScadaServer\<project name>
[Login]> ServerAdr : Database address
[Login]> DbName : Database name
[Login]> DbUserName : Database user name
[Login]> DbPassword : Database password
[Connection] > Port : The default server port is 560. A different port can be selected by changing this parameter.
[Logging] > IsLogging : Data logging can be enabled / disabled(true/false)
[Logging] > IsLoggingDısconnections: You can choose whether to log connection failures
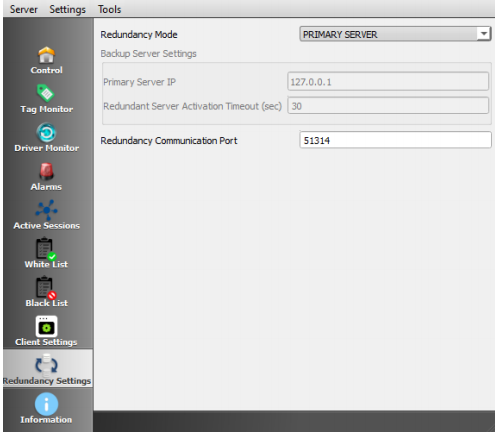
[REDUNDANCY]> ServerMode : Determines the mode of operation. This value can be PRIMARY or BACKUP. When this mode is set to BACKUP, the server communicates with the PRIMARY server to form a redundant structure.
[REDUNDANCY]> PrimaryIP : The PRIMARY server IP address to which the server in BACKUP mode will connect is written in this field.
[REDUNDANCY]> PrimaryPORT : The port number of the PRIMARY server to which the server in BACKUP mode will connect is written in this field.
[REDUNDANCY]> Timeout : PRIMARY is the value in seconds that specifies how long the server will remain active if the BACKUP server is down.
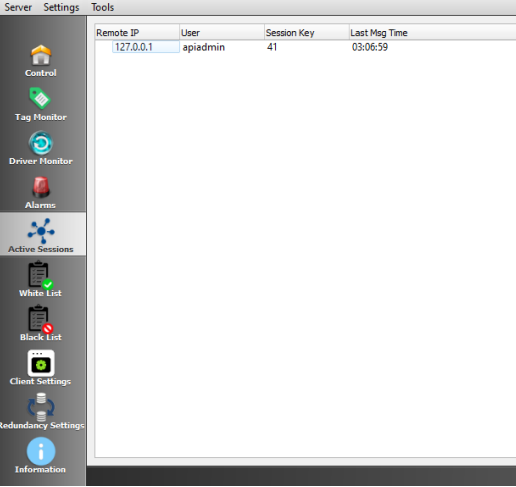
Active Sessions
It shows the information of the people who log on in the server and client environment. Contains remote IP, user, session key, last msg time informations.
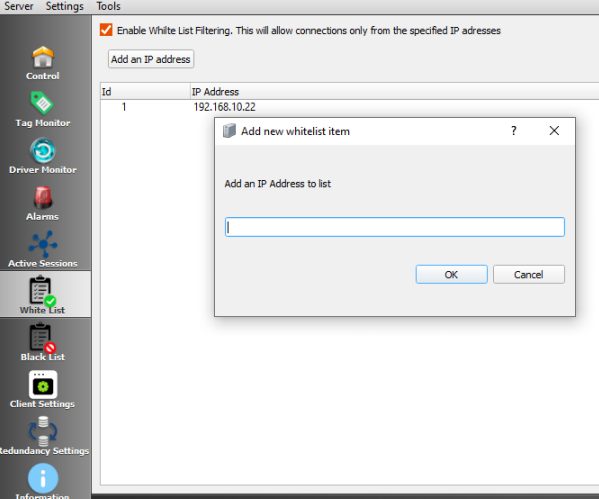
White List
This will allow connections only from the specifed IP adresses.
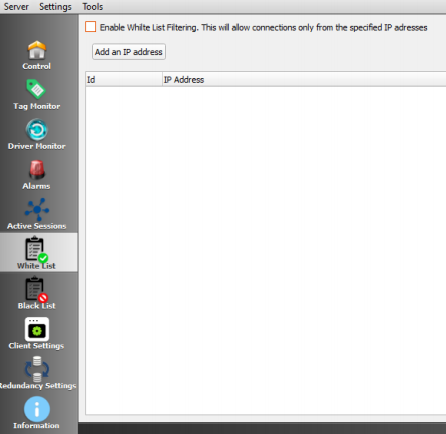
Enable white list filtering. By clicking add an IP address, IP address is entered into the window displayed.
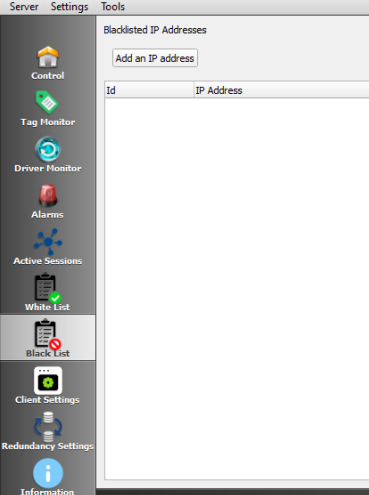
Black List
By clicking add an IP address, IP address is entered into the window displayed. The IP addresses entered are blocked and access to the server is prohibited.
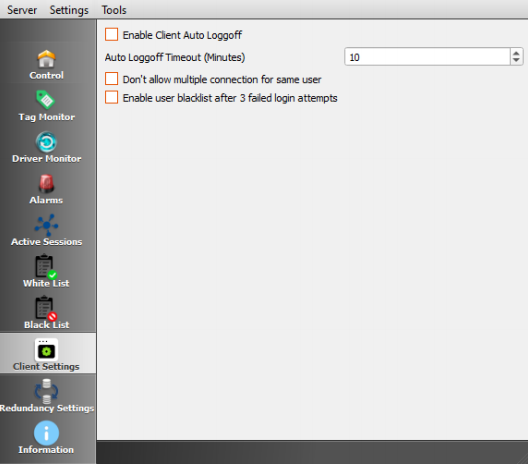
Client Settings
Enable Client Auto Loggoff
If no operations are performed on the client screen for the specified time in minutes when enable client auto loggoff is marked, the session is closed automatically.
Don’t allow multiple connection for same user
When don’t allow multiple connection for same user is marked, multiple logins are prohibited on the client screen with the same user.
Enable user blacklist after 3 failed login attempts
If the user information is entered incorrectly 3 times on the client screen when enable user blacklist after 3 failed login attempts is marked, the IP address is automatically black list.
Parallel Redundant Operating Mode
ViewPLUS SCADA software can run in "Parallel Redundant Mode" on a server cluster consisting of several computers. In this case, the server downtime can be reduced to the minimum. Redundant mode servers must be on the same local area network.
Installation Steps
While ViewPLUS is running in this mode, both 2 servers (PRIMARY, BACKUP) must be able to access the project database over the network. At the same time, project files must be present on the server computers and they must be up to date (same as each other). To ensure this synchronization, a version control tool such as SVN can be used or the files can be moved manually. In order for the backup and main server to communicate, the main server must have port 51313 open on the computer. Make sure that this port is allowed in the firewall settings. In the next step, the following configuration settings must be made in the ScadaServer.ini files on the primary server (PRIMARY) and the backup server (BACKUP): Primary server(PRIMARY):
[REDUNDANCY]
ServerMode=PRIMARY
PrimaryIP=192.168.2.201
PrimaryPORT=51314
Timeout=60
size=0
Backup server(BACKUP):
[REDUNDANCY]
ServerMode=BACKUP
PrimaryIP=192.168.2.201
PrimaryPORT=51314
Timeout=60
size=0
ServerMode: Specifies the backup operation mode. This value can be PRIMARY or BACKUP. When this mode is set to BACKUP, the server communicates with the PRIMARY server to create a redundant structure. PrimaryIP: The PRIMARY server IP address to which the server in BACKUP mode will connect is written in this field. PrimaryPORT: The port number of the PRIMARY server to which the server in BACKUP mode will connect is written in this field. Timeout: Is the value in seconds that specifies the time PRIMARY server is out of service before the BACKUP server become active.
In the example, the IP address of the primary server (PRIMARY) is a fixed IP of "192.168.2.201". The IP address of the primary server in the system to be installed must be a static IP in this way, variable IP from a DHCP server should not be used. The port number set in PrimaryPORT can be set differently according to security requirements. In this case, the correct port number should be entered by modifying every 2 configuration files.
After the configuration process is completed, first the primary and then the backup servers are started . From this moment on, the backup server will switch on and off in case of a shutdown, watching the primary server. When the primary server becomes active again, the backup server will stop itself by switching to the watching mode.
Synchronization of the Project on the Backup Server
When the backup server starts running, the server will use the files in the project folder. Therefore, if these files are not synchronized with the files on the main server, an older version of the project will be sent to the clients. A synchronization mechanism must be established to prevent this from happening.
Assuming that the project files are on the SVN version control server as described earlier, you can provide automatic synchronization as follows
We create a batch script that will trigger SVN synchronization. In this example, the file name is updateSvn.bat. Modify the contents of the file according to the file paths in your system to make it like this:
CD D:\MIKRODEV\Projects\DepoProject
"C:\Program Files\TortoiseSVN\bin\svn.exe" update
Every time we run this script, it will synchronize the project folder with that of the SVN server.
In the next step, this script will be configured to run at specific intervals. For this we will use the Windows "Schedule Tasks" tool. By following the steps below, the synchronization procedure will be run every 10 minutes. You can configure this time interval as you like.
Task Scheduler
Create a new task
Timing Programming
Set timing settings. In this example we choose to work once every 10 minutes.
Script Selection
Finally, associate the .bat file you created with the timer.
If you confirm the timer, the backup server will synchronize itself every 10 minutes with the project on the main server.
In case of failure, downtime or excessive traffic at the primary server, a redundant server can be implemented to take the primary server's place. When backup server is selected in redundancy mode, primary server IP and redundant server activation timeout are entered.
Information
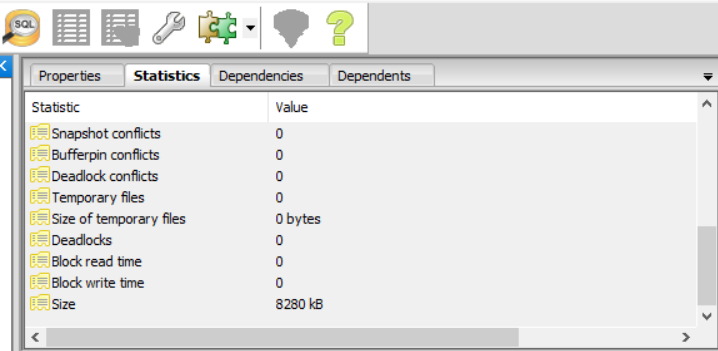
The Information tab shows the capacity information that the project occupies in the database.
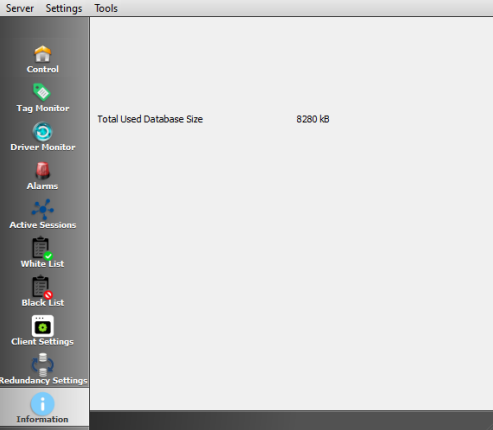
The size of the project in the PostgreSQL database is shown below.