MQTT Application Notes
MQTT PROTOCOL
General Information
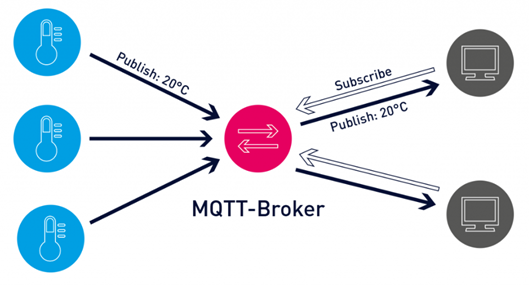
MQTT (Message Queuing Telemetry Transport) protocol is a machine-to-machine (M2M) message-based protocol widely used on the Internet. It has been adopted in the Internet of Things (IoT) ecosystem with its light weight and low resource consumption. Almost all IoT cloud platforms support MQTT protocol to send and receive data from smart objects.
Block Definitions
MQTT Config Block
To configure MQTT settings, you must first add the Mqtt Config block to your project.

Pin Definitions;
• Soc: It is used for TCP socket block connection. Mqtt Config block cannot be used without TCP socket block.
• Trg: When periodic data transfer is desired, a trigger should be given to the mqtt config block from this input. If this entry is left blank, data is transmitted according to other specified conditions.
• Mqtt0: Output showing the connection status. The information from this output is as follows;
      - 0: TCP Disconnected
      - 1: TCP Connecting
      - 2: MQTT Connecting
      - 3: MQTT Connected
• Sta: Output showing the communication status. The information from this output means:
      - 0: MQTT Send Conn Pack
      - 1: MQTT Idle Status
      - 2: MQTT Subscribe Status
      - 3: MQTT Publish Status
• Pub: Output showing Publish timeout.
Mqtt Config Block Custom Settings;
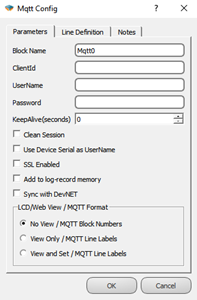
Definitions;
• Client Id: The field where the device is manually given an ID for the broker connection.
• User Name: The field where the device is named for the broker connection.
• Password: Password field entered in the device for the broker connection.
• Keep Alive: If the connection between the broker and the Publisher is lost, the waiting time before reconnecting.
• Clean Session: If selected, messages will be broadcast if there is communication between the device and the broker, otherwise the information recorded in communication interruptions will not be sent.
• Use Device Serial as User Name: If selected, the serial number of the device is used as the device username.
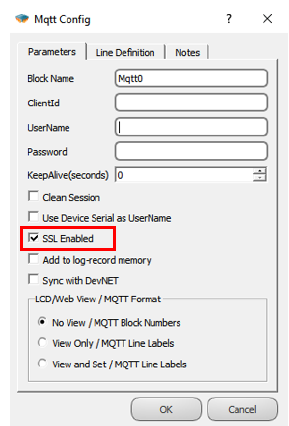
• SSL Enabled: It is marked to make the connection with SSL. (Only active in DM Series.)
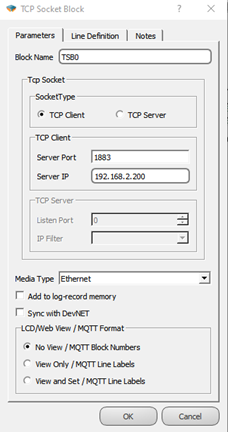
TCP Socket Block Connection
The output of the TCP Socket block is connected to the Soc input of the Mqtt Config block.

The special settings of the TCP Socket block should be made for mqtt connection as follows;
• TCP Client should be selected as the socket type,
• The mqtt server IP to be connected to the Server IP section must be entered,
• Mqtt server port information should be entered in the Server Port Section,
• As for the media type, Ethernet, GSM or WI-FI can be selected according to the characteristics of the microdev device used.
MQTT Table
The table where all MQTT-related adjustments are made can be accessed from the Projects/MQTT Table tab.
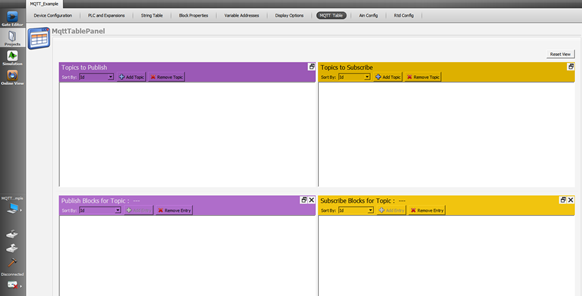
Topics The Publish
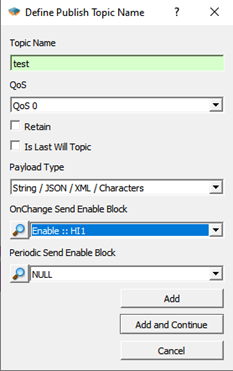
In this table, the Publish topic is entered to publish the data to the broker. The topic name is entered on the screen that appears by pressing the Add Topic button in the table. Block definitions where you can enable/disable Qos, Retain, Last Will, Payload settings, send on exchange and periodically send options are also made on this page.
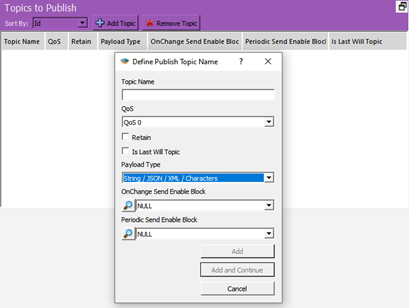
Definitions;
• Topic Name: The field where the topics you will send the messages are determined.
• QoS: Quality of Service refers to the agreement between the sender of a message and the receiver of the message. The QoS levels are as follows;
o QoS 0: Minimum data transfer is ensured. At this level, each message is forwarded to a subscriber and no confirmation is received that the message has arrived.
o QoS 1: The broker tries to transmit the message and waits for an acknowledgment response from the subscriber, if no confirmation is received within a specified time frame, the message is sent again.
o QoS 2: The broker receives two acknowledgments to ensure that the subscriber receives the message and only once.
• Retain: If this option is checked, if the connection between the broker and the subscriber is broken, the last value will be saved in memory.
• Is Last Will Topic: Last will topic. If a topic is created and this option is checked, the message under this topic will be forwarded to the subscribers when the device is disconnected from the broker.
• Payload Type: It is determined in which format the message content will be sent. Subscriber interprets incoming messages with this information. “MJson v1” can be selected if a time stamp is desired to be added to the sent messages.
• On Change Send Enable Block: Block selection added in the diagram to enable or disable the sending feature of the created topic on change.
• Periodic Send Enable Block: Block selection added in the diagram to enable or disable the periodic sending feature of the created topic.
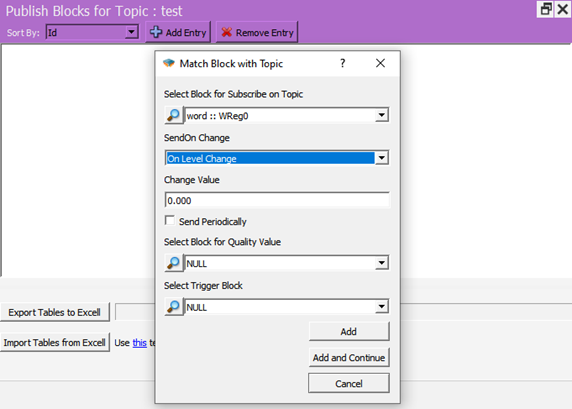
Publish Blocks for Topic
In this table, the blocks to be published for the relevant Topic are selected. After clicking the topic in the Publish to topic table, the Add Entry button becomes active and by pressing this button, the block to be published in the project is selected. How to transmit the data can also be selected from the screen.
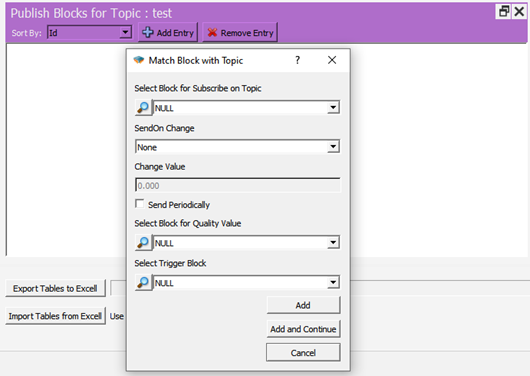
Definitions;
• Select Block for Subscribe on Topic: The area where the block that you want to send as a message in your project is selected.
• Send On Change: Send selection field on exchange
o On Level Change: Send when there is a change in the value specified in Change Value, if 0 is written, it will be sent in every change.

o On Percent Change: Send when there is a percentage change of value specified in Change Value, for example 10%.
• Change Value: Change amount input field.
• Send Periodcally: If checked, a message is sent every time a trigger comes to the trg input of the mqtt config block.
• Select Block for Quality Value: The block in which the Quality value included in the message content is selected in MJson v1 payload type.
• Select Trigger Block: Apart from change or periodicity, we can send the message by triggering the block we will specify here.
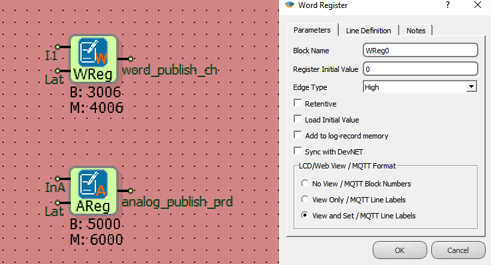
Note: Blocks used in messages; It can be sent and received with the block number (B:3006) under the block, or it can be added to the messages with line tags (word_publish_ch). This selection is made under the Mqtt Format tab in the block properties.
• Message that will appear if View and Set is selected;
![]()
• The message that will appear if No View is selected;
![]()
Subscribe to Topic
In this table, the relevant subscribe topic is entered to send data from the broker to the device.
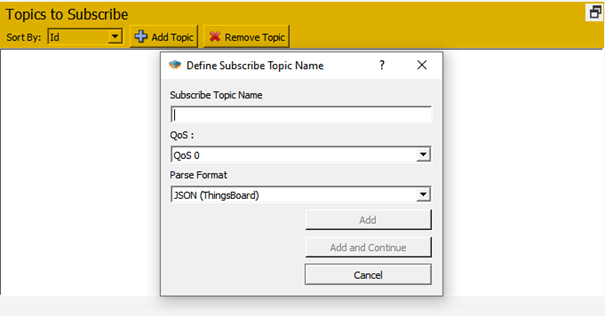
Definitions;
• Subscribe Topic Name: Enter the name of the topic to be subscribed to.
• QoS: Service quality level is selected.
• Parse Format: Select the format in which the messages will be parsed.
Subscribed Block Values for Topic
From this screen, the blocks to be associated for the subscribe topic are added. To use line tags, mqtt format should be selected as view and set from the special settings of the relevant block.

Special Applications
Ubidots
When you want to use Mikrodev PLC with ubidots mqtt, the following steps should be followed in addition to the settings described above;
From the Mqtt Config block custom settings, Ubidots ID should be entered in the Client Id section and the Token Key of the device created in Ubidots should be entered in the Username section.
Publish Topic: Enter as /v1.6/devices/< Device Name >. There is no need to define variables in the ubidots calculation for the blocks to be associated. With the first sent data, the variables are created automatically by Ubidots. The data is read on the Ubidots server with the block number or line tag.
Subscribe Topic: Entered as /v1.6/devices/< Device Name >/< Value Name >. A separate connection must be defined for each data to be subscribed. Data must be defined in the Ubidots environment. If the line tag is to be used, the variable created in Ubidots should have the same name as the line tag, if the line tag is to be transmitted only with the block number, the variable with the same name as the block number should be defined in the ubidots environment.
Example Applications
Topic Publish
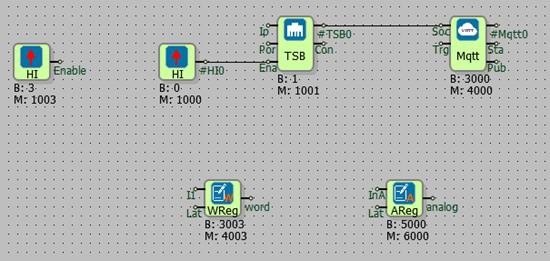
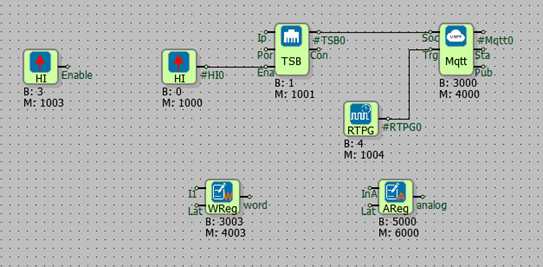
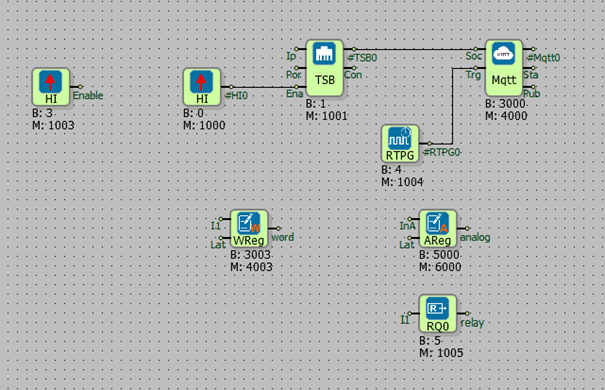
General Configuration; After the project is created, the diagram is designed as in the figure, the mqtt formats of word and analog registers are selected as view and set.
Send On Change;
Follow Projects > MQTT Table >Topics to Publish > Add Topic.
Select the Topic name, enter the High gate we have prepared in the diagram for the OnChange Send Enable Block, and click add.
Then, from the Publish Blocks for Topic section in a subtable, click to the Add Entry.
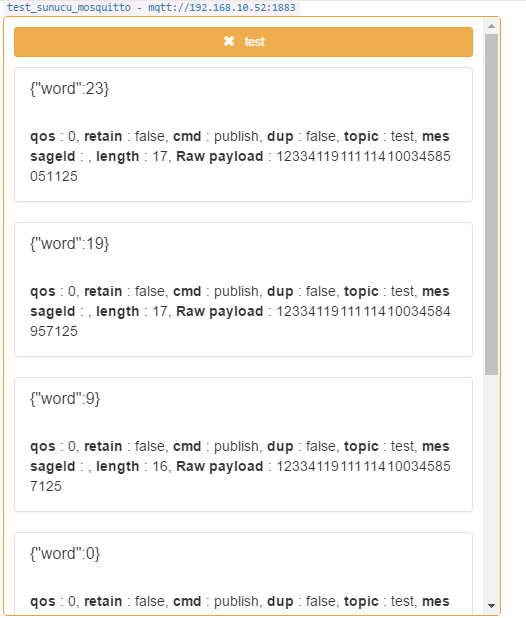
Select the block in the diagram that you want to broadcast as a message to the Select Block for Subscribe on Topic section. In the SendOn Change section, On Level Change is selected and Change Value is set to 0 so that it can send a message every time the value changes. Click on Add and continue.
The project is loaded on the device and online monitoring is opened.
Subscribe to the topic opened with a program such as MQTTBox. After watching the mqtt config block value of 3 in online monitoring in the Mikrodiagram, when the value of the register is changed, it is seen that the value is published.
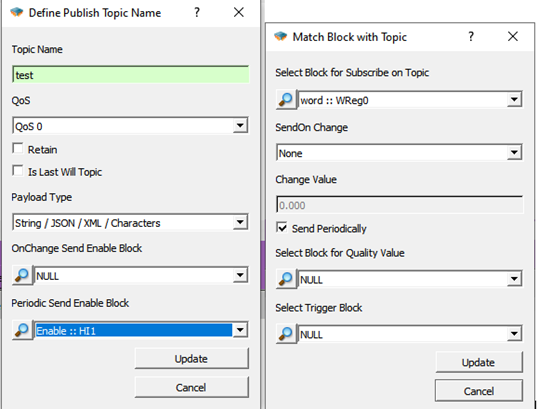
Periodic Send; In addition to the configuration sent in the change, a real time pulse generator is added to the trg input of the mqtt config block,
Real time pulse generator is set for 5 seconds to broadcast a message periodically every 5 seconds and the created topic is changed as follows. OnChange Enable Block= NULL and Set the High gate in the Periodic Send Enable Block diagram, In the Select Block for Subscribe on Topic section, select SendOn Change= None and click Send Periodically.
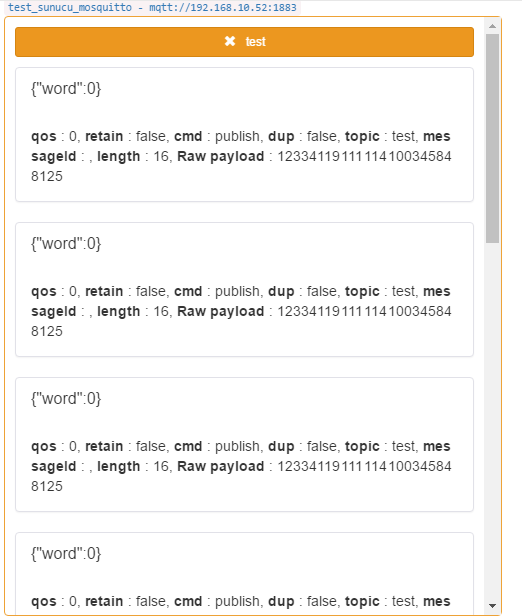
The project is loaded back to the device and incoming messages are observed.
Subscribe Topic
General Configuration;
After the project is created, the diagram is designed as in the figure, the mqtt formats of the word and analog registers and the relay output are selected as view and set.
Follow Projects > MQTT Table >Topics to Subscribe > Add Topic.
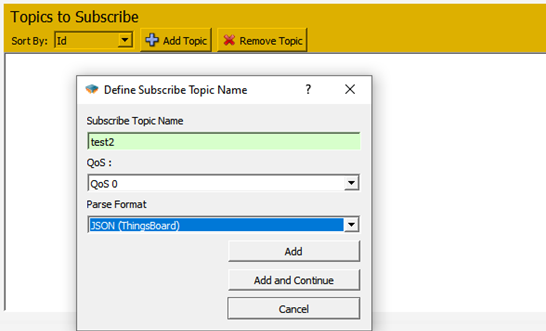
Enter the topic name and click Add. Then, the add entry is clicked from the Publish Blocks for Topic section in a subtable.

Here, the block to which the subscribed value will be transferred is selected.

After all blocks to be subscribed are determined, the project is loaded into the device.
![]()
When the message is published to the test2 topic with the above format, the final state of the variables is as follows;

SETTING UP MQTT CONNECTION WITH SSL
Secure Sockets Layer (SSL) and Transport Layer security (TLS) are protocols that provide secure communications over a computer network or link. SSL/TLS provides data encryption, data integrity and authentication.
“SSL Enabled” option in block special settings of Mqtt Config Block; It provides secure MQTT connection with SSL Certificate. This option only active in DM Series.
In order to use this feature, an SSL Certificate must be uploaded on the device and the "SSL Enabled" option of the Mqtt Config block must be checked.