ViewPLUS SCADA MQTT Channel Definitions Application Notes
Mosquitto Installation
In order for the ViewPLUS SCADA software to communicate via MQTT, both the MQTT broker and the SCADA server should be started on the same computer.
Therefore, it is necessary to first install the Mosquitto program, which is the MQTT broker, on the computer where the SCADA server will run.
Click here to download the Mosquitto broker.
Click on the appropriate link in the download link and run the downloaded exe application on your computer.
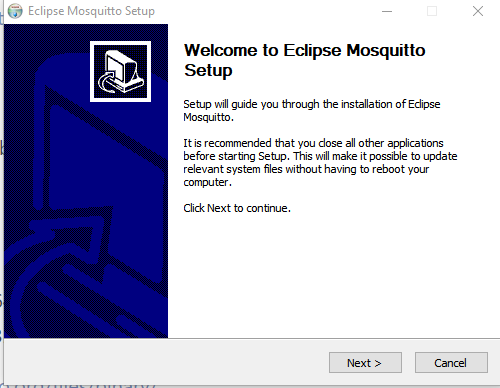
Click on the "Next" option in the Mosquitto installation wizard.
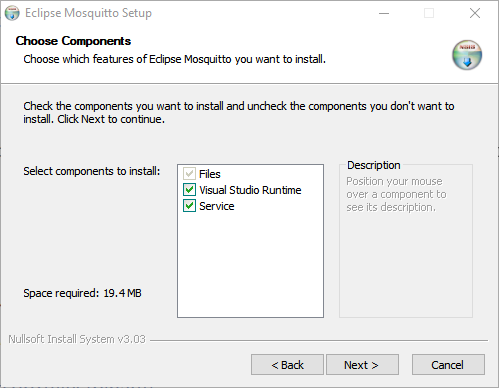
Select the components you want to download in the Mosquitto program and click on the "Next" option.
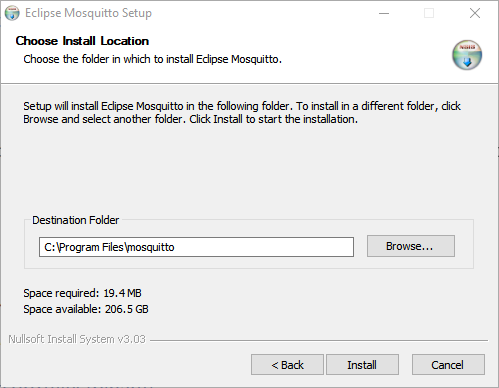
Choose the file path where the program will be installed and click on the "Install" option.
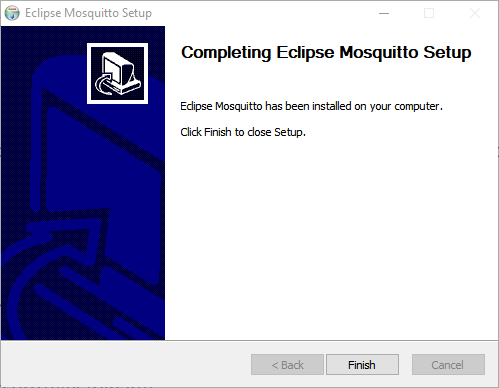
Click on the "Finish" option in the installation completed window and exit the screen.
After the installation is complete, the configuration settings of the Mosquitto broker need to be done before running the program.
Mosquitto Configuration Settings
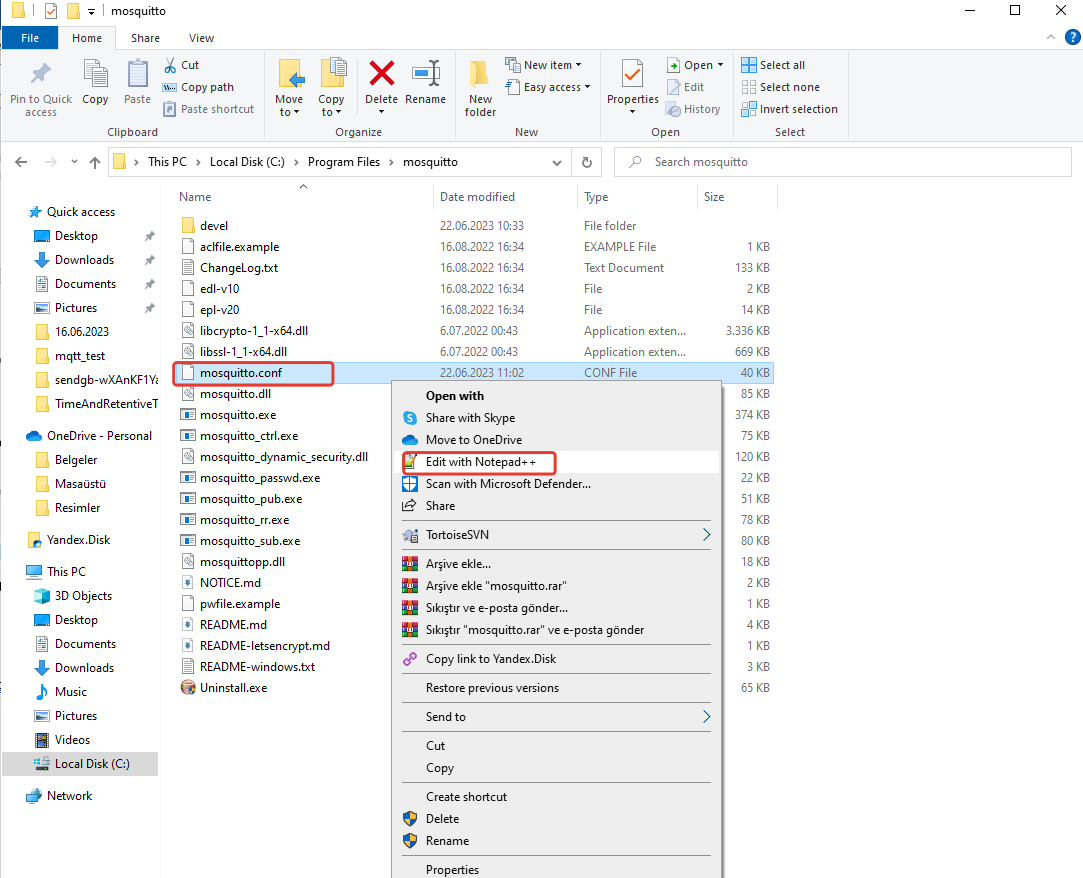
Navigate to the installation directory of the program.
If you did not change the file path during the installation, it is located inside Local Disk (C:) under Program Files.

Open the folder named "mosquitto" and click on the "Edit with Notepad++" option for the file named "mosquitto.conf" located inside the folder. (Please make sure that Notepad++ application is installed on your computer.)
To find the "Security" heading in the opened file and remove the statement
#allow_anonymous false under this heading.
Add a new line containing
allow_anonymous true
listener 1883
add the statement
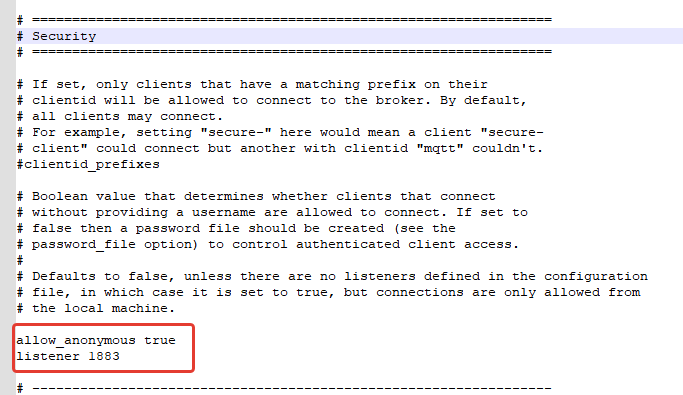
By doing this, we have now defined the default port 1883 for MQTT in the broker's settings.
Save the edited file and close it.
Running Mosquitto Broker
After making the configuration settings, run the command prompt as an administrator.
Start menu -> Type "cmd" in the search bar. -> Hover over the Command Prompt application that appears at the top. -> Right-click on the Command Prompt application. -> Click on the "Run as administrator" option.
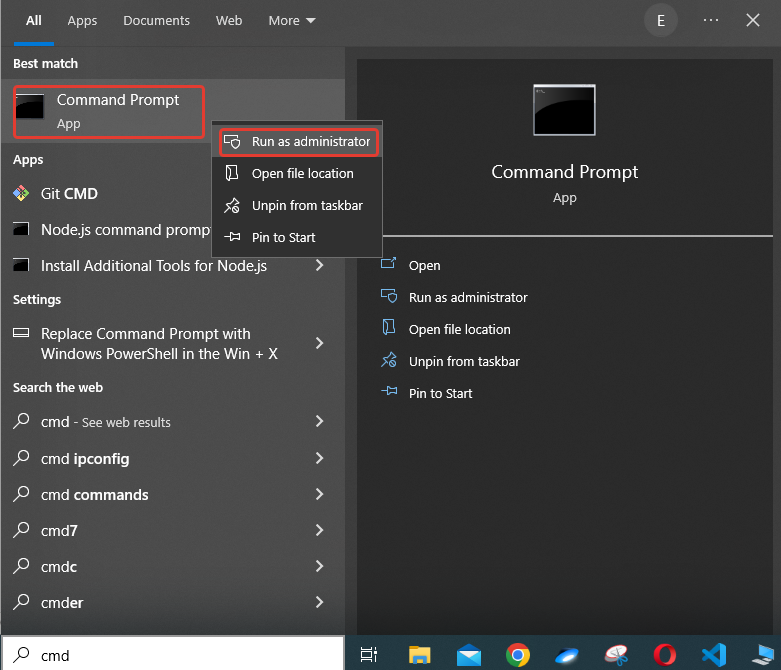
In the opened window, click "Yes" to proceed.
In the command prompt that appears, type the following command and press Enter:
net start mosquitto
The Mosquitto Broker service is starting.
The Mosquitto Broker service was started successfully should appear on the screen.

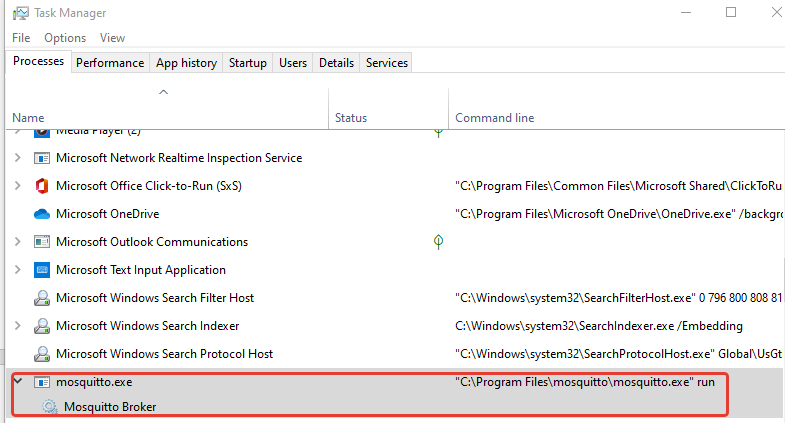
Open the Task Manager and locate the Mosquitto application from the "Background processes" section. Make sure that the Mosquitto Broker is running on your computer.
Closing a Running Mosquitto Broker
There are two ways to close the running Mosquitto Broker on your computer.
First method: You can close the Mosquitto Broker application through the Task Manager. Follow the steps below:
Open the Task Manager. From the "Background processes" section, locate the "mosquitto.exe" application.
Hover over the "mosquitto.exe" application, right-click on it, and select the "End task" option.
Second method: You can close the Mosquitto Broker application through the command line. Follow the steps below:
Start menu -> Type "cmd" in the search bar. -> Hover over the Command Prompt application that appears at the top. -> Right-click on the Command Prompt application. -> Click on the "Run as administrator" option.

In the opened window, click "Yes" to proceed.
In the command prompt that appears, type the following command and press Enter:
net stop mosquitto
The Mosquitto Broker service is stopping.
The Mosquitto Broker service was stopped successfully appear on the screen.

ViewPLUS Scada Tag Channel Editor
MQTT Client Channel Definitions
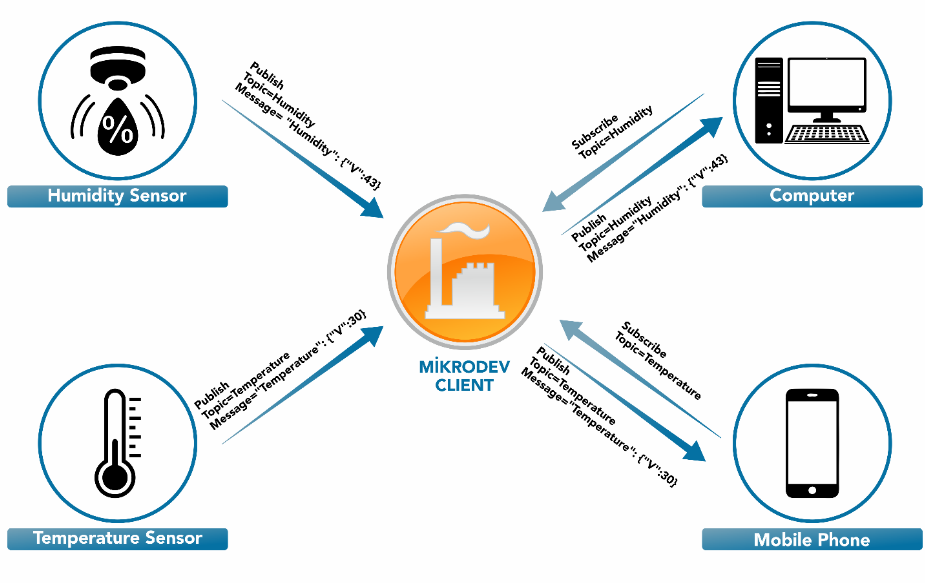
Mikrodev Client receives messages from publisher units and forwards them to subscribed units. When sending a message, it uses topics to filter the customer units that will receive the message.
The working structure of Mikrodev Client is explained in the following diagram.
The Mikrodev MQTT Client supports the following data types.

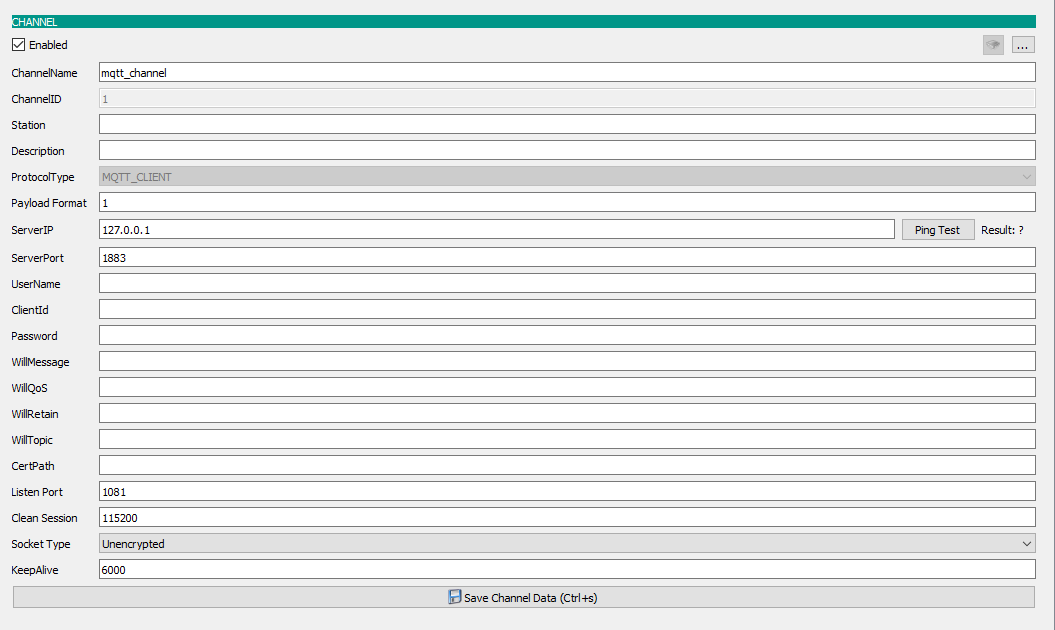
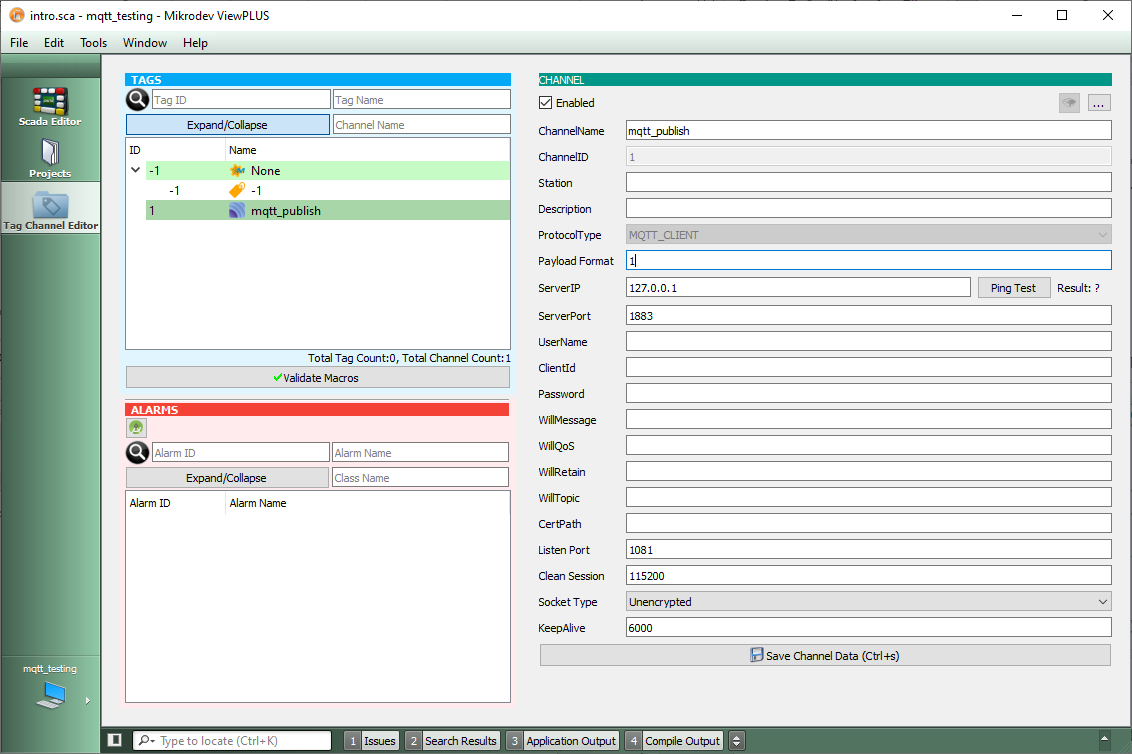
The following settings need to be configured in the MQTT channel.
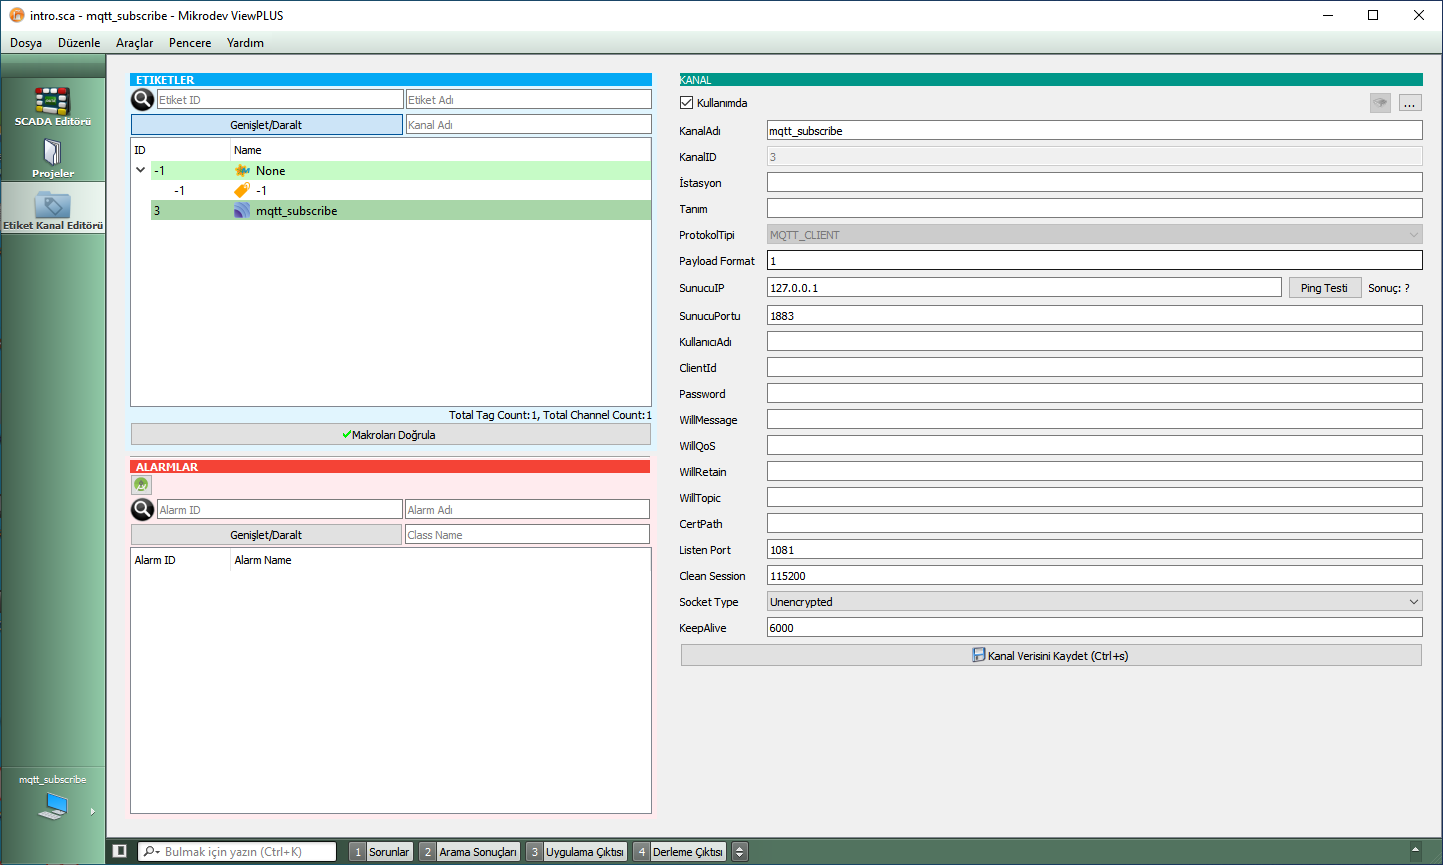
Payload Format: 1
ServerIP: 127.0.0.1
ServerPort: 1883
Listen Port: 1081
Clean Session: 115200
Socket Type: Unencrypted
KeepAlive: 6000
Publishing a Value via SCADA
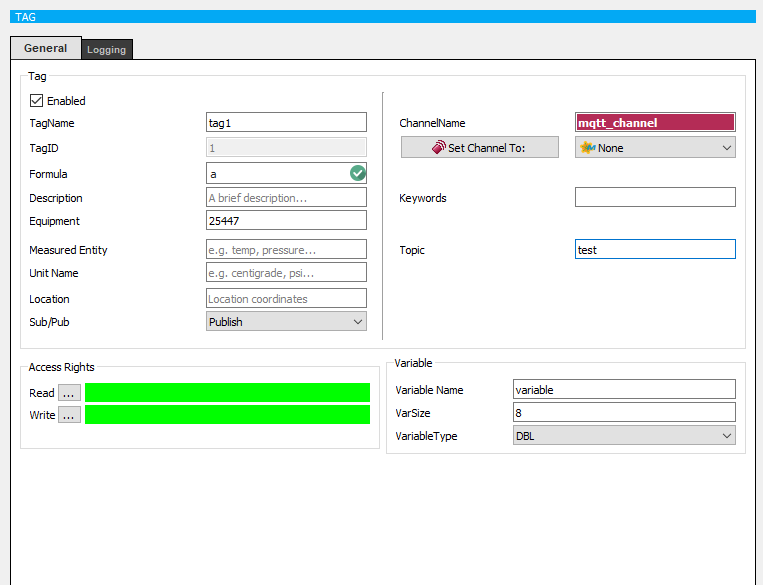
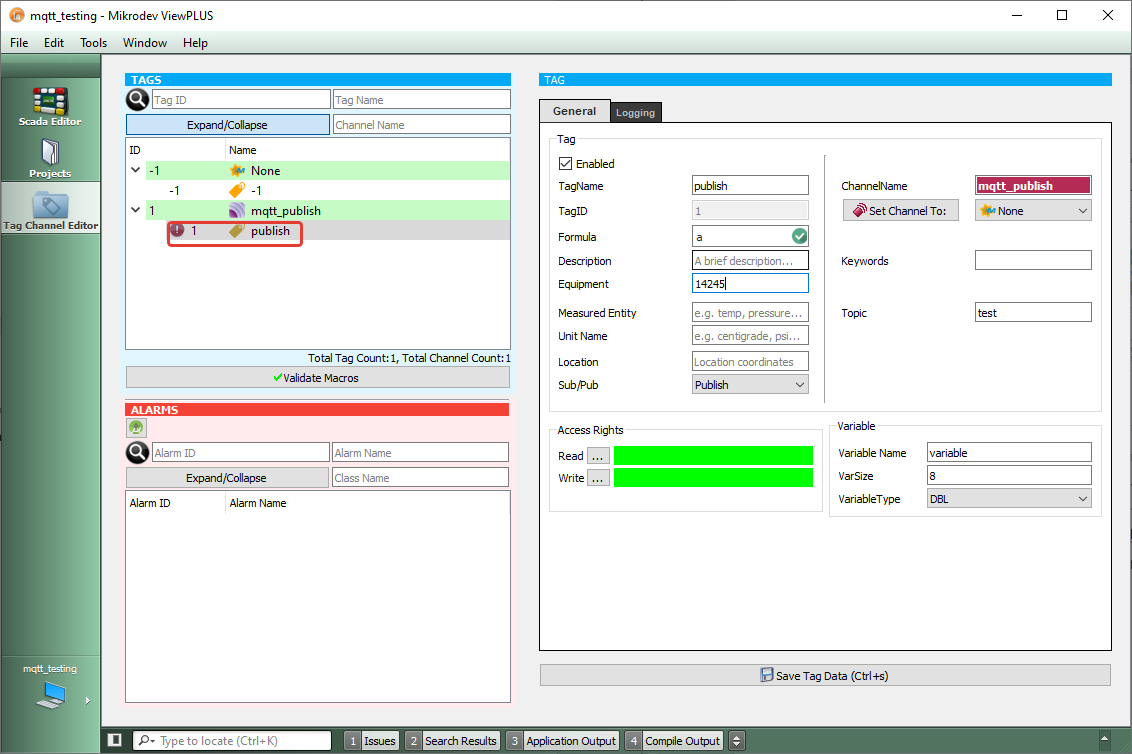
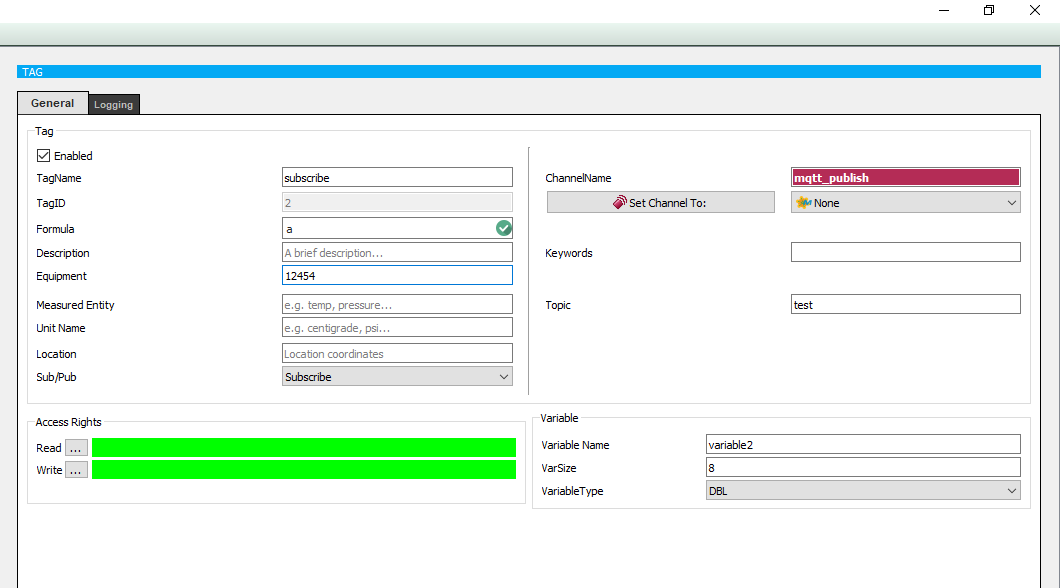
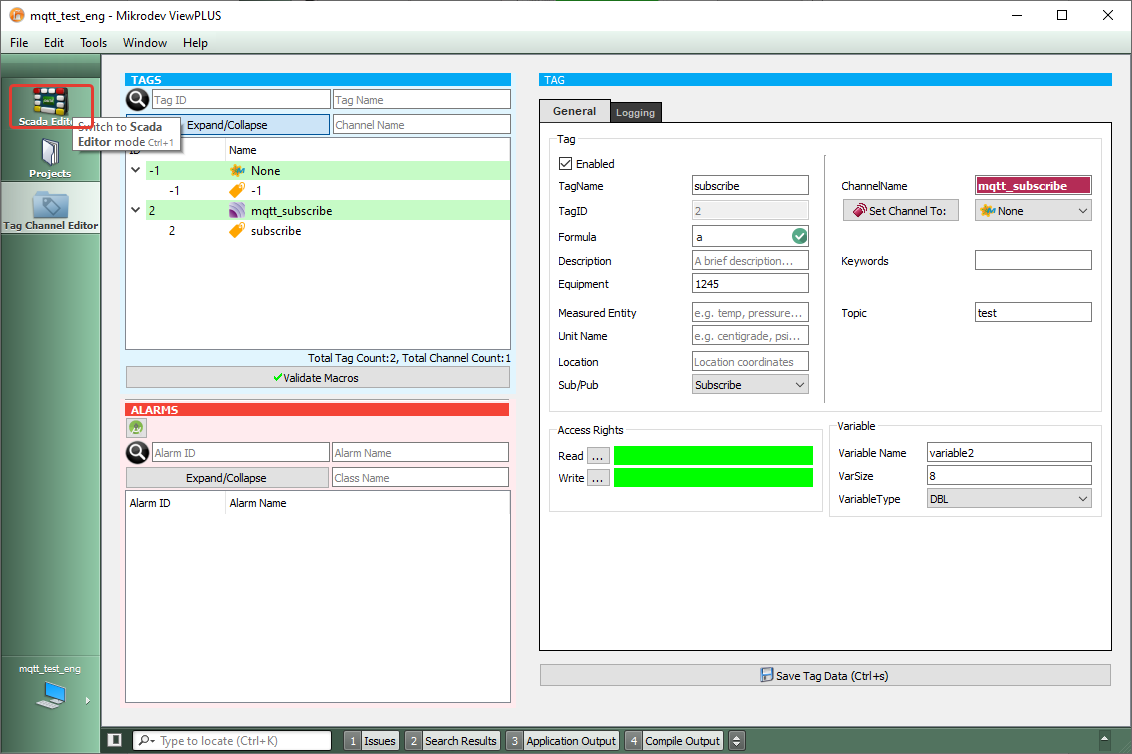
Equipment: Device ID information is entered here. (This field can be left blank.)
Topic: The topic for publishing is entered in this field.
Sub/Pub: The selection for Publish, Subscribe, or both is made here. Since we are discussing value publishing under this topic, the Publish option should be selected.
Variable Name: The variable name is written here. The variable name mentioned here refers to the tag name of the label in the PLC project.
Variable Type: The variable type is selected here. ViewPLUS SCADA only supports BOOL and DBL variable types.
VarSize: The SCADA program automatically assigns the variable size based on the variable type.
Note: The ViewPLUS SCADA editor supports two different variable types as tag types. These are Boolean and Double data types.
Example of Publishing a Value via SCADA
Note: In this example, simulation will be done using the MQTT Box program.
Click here to download the MQTT Box program for Windows.
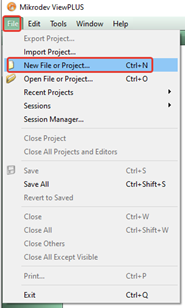
Open the ViewPLUS SCADA editor. Click on File -> New File or Project. Create a new project.
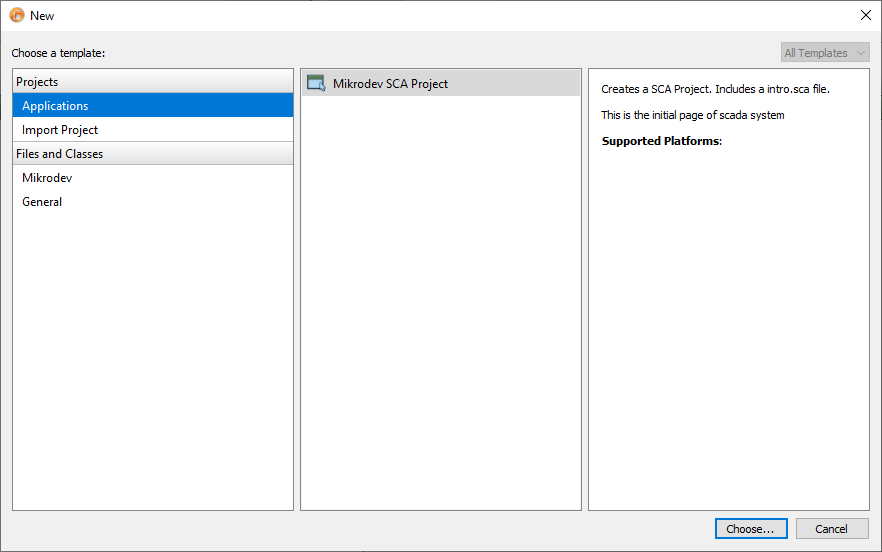
From the opened screen, select Projects -> Applications and click on the "Select" text located at the bottom right corner.
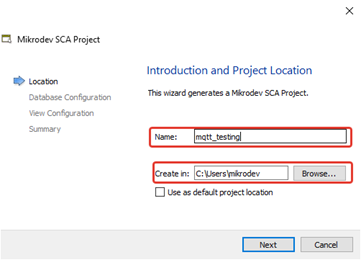
From the opened screen, select the project name and choose the file location where the project file will be saved. Click on "Next."
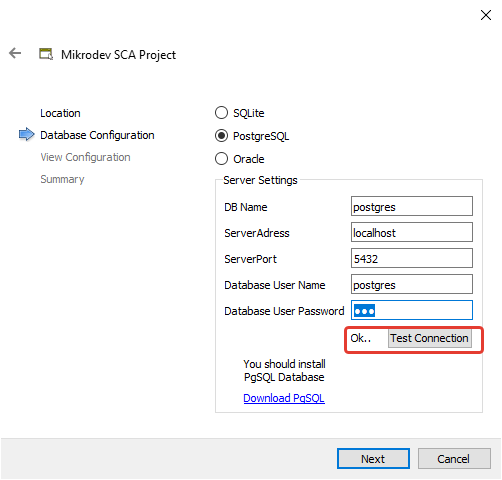
Enter the password you set during the PostgreSQL installation in the "Database User Password" section of the database settings, and click on "Test Connection." If you entered the password correctly, the screen will display "Ok." Once you see "Ok," click on "Next."
You can adjust the SCADA design page settings from the View Settings page. This can also be done after creating the project. After making the adjustments, click on "Next."

The Summary screen displays general information about the project. After clicking on "Finish," a new project will be created.

The connection between the newly created project and the database is checked from the information screen that appears on the screen.

The newly created project name will appear under the Projects section.
To publish a value using the MQTT Client channel via SCADA, first open the tag channel editor.

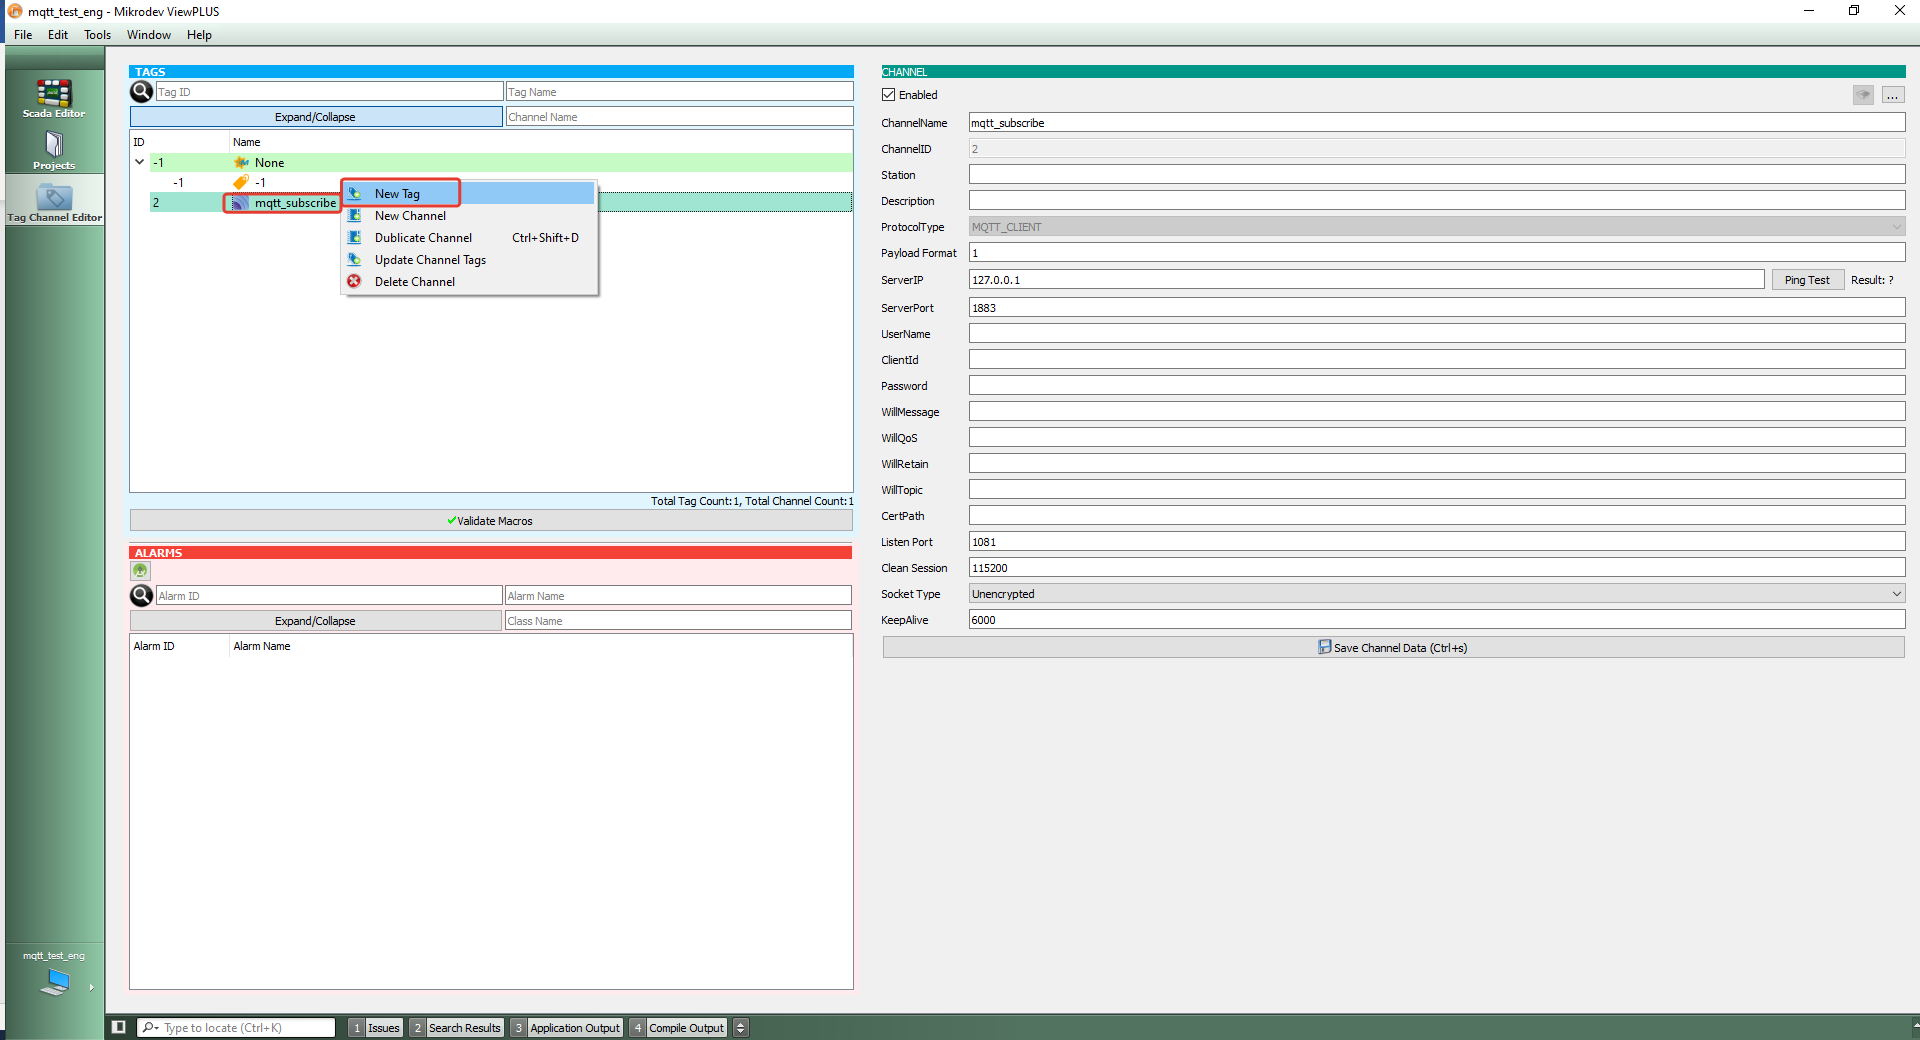
Right-click on the "None" expression and select the "New Channel" option.
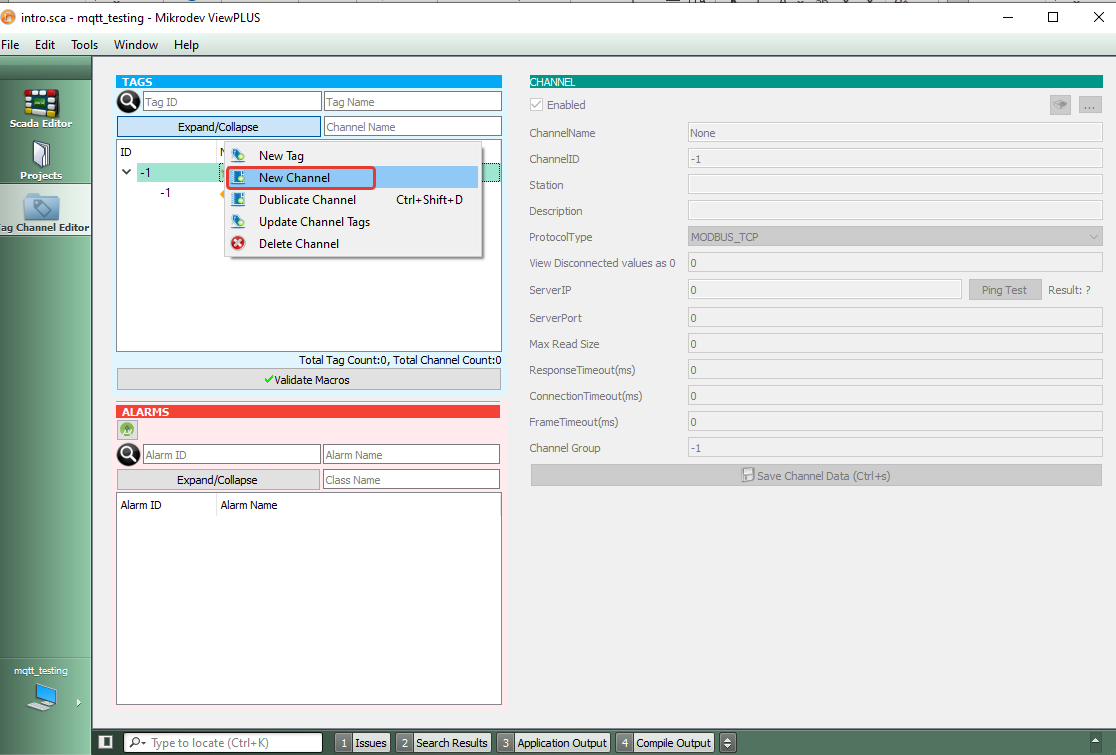
Enter the channel name in the popup screen, and select the "MQTT_CLIENT" option from the protocol type section. Click on "Ok."

Configure the channel settings as described in Figure 2.
To add a new tag under this created channel, hover over the prepared MQTT channel and right-click. Click on the "New Tag" option.
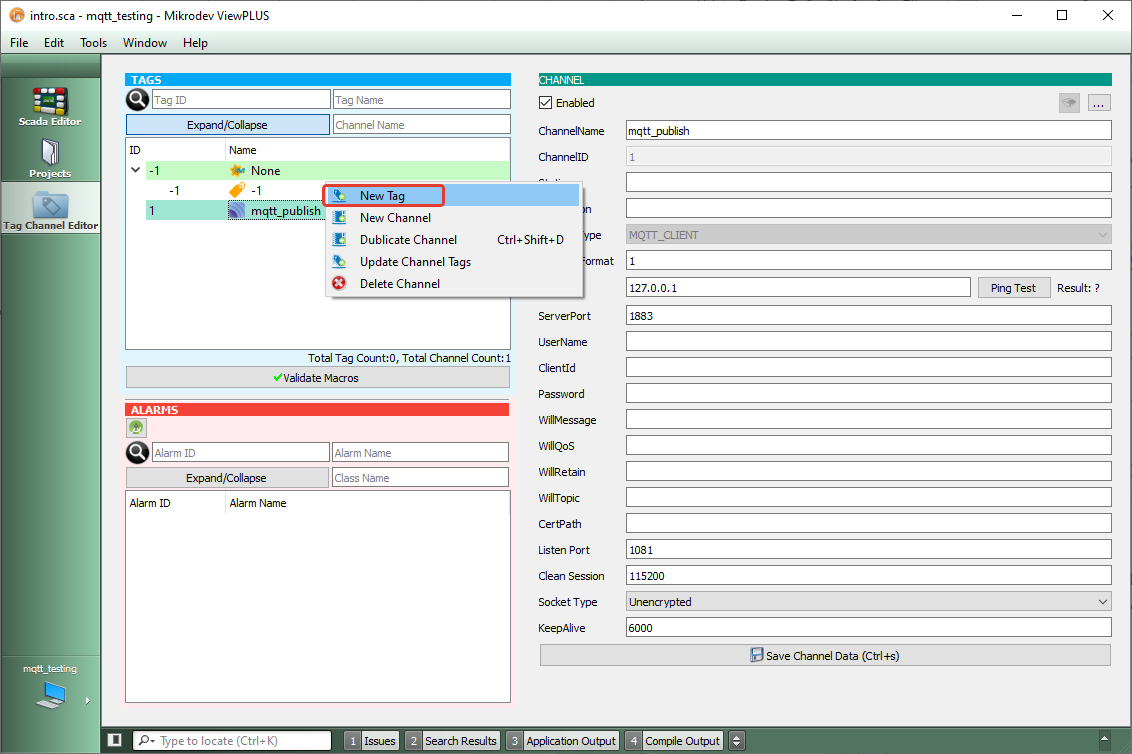
In the popup screen, enter a new tag name and click on "Ok."

To view the created tag under the channel, click on the arrow button located on the left side of the channel name. Here, you will find the tags under the channel. Click on the prepared tag.
According to Section 2.1.1, make the tag definitions. Press CTRL + S to save the changes or click on the "Save Tag Data" text located at the bottom of the tag screen. When the changes are saved, the exclamation mark symbol that appears on the left side of the tag name will disappear.
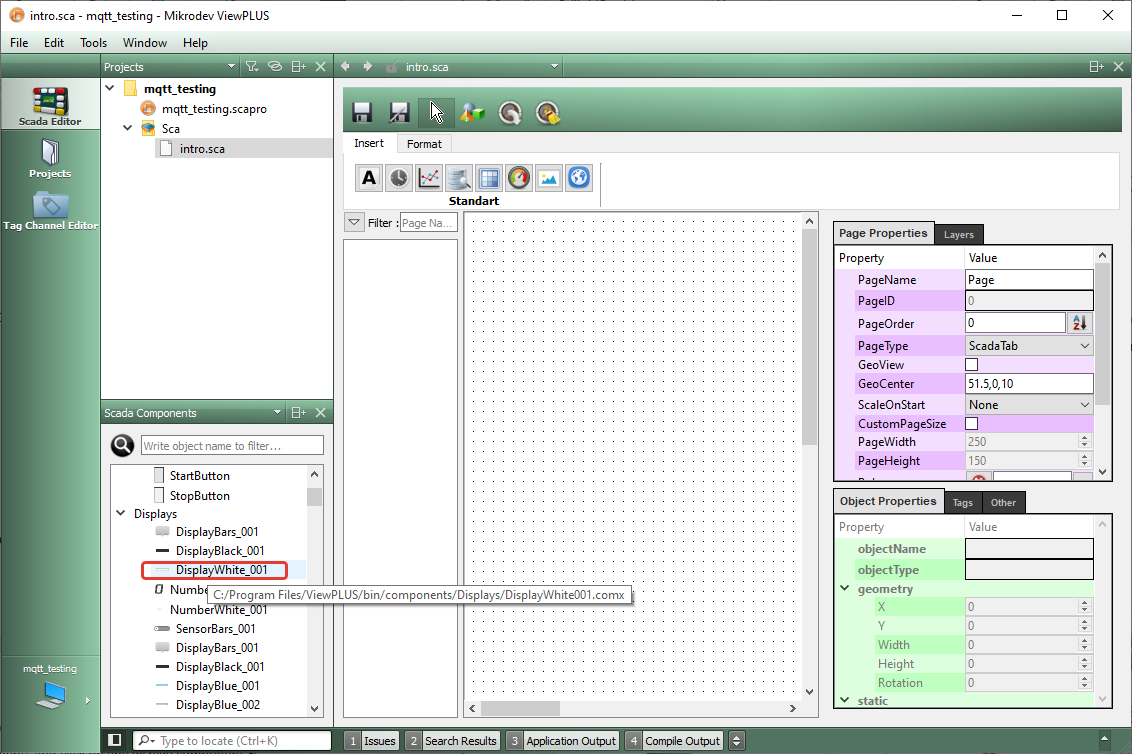
To publish a value via the SCADA program, a display component should be added to the SCADA page.
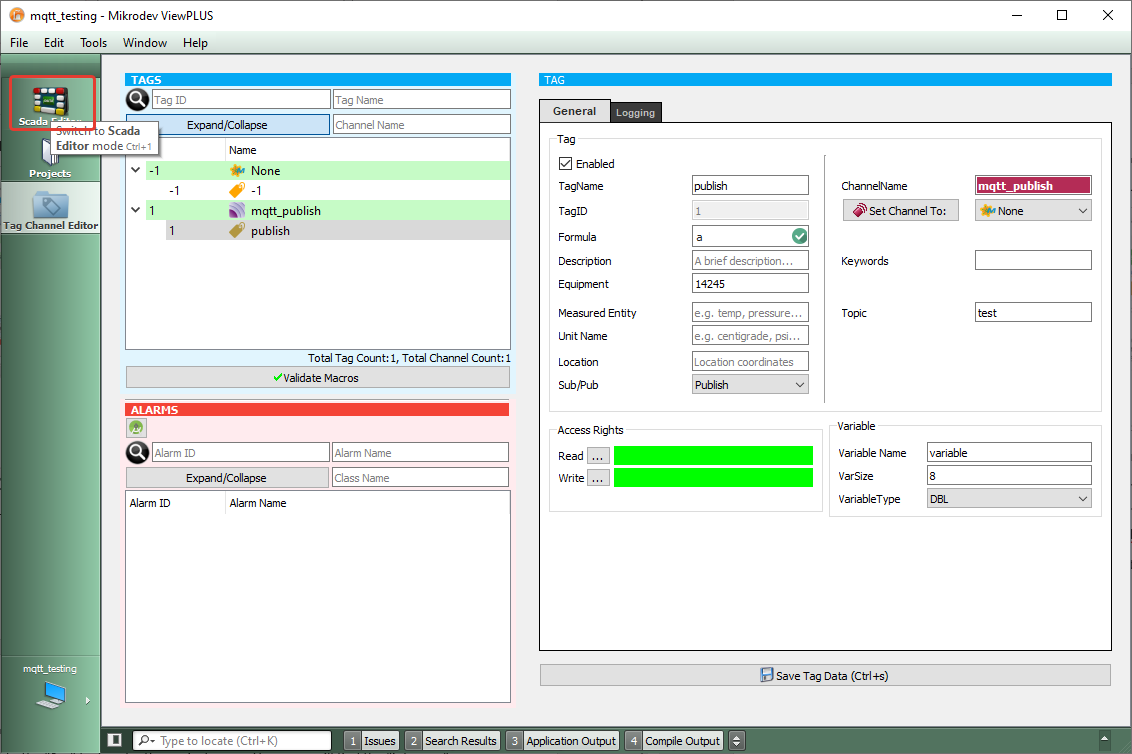
Click on the "SCADA Editor" text located on the left side.
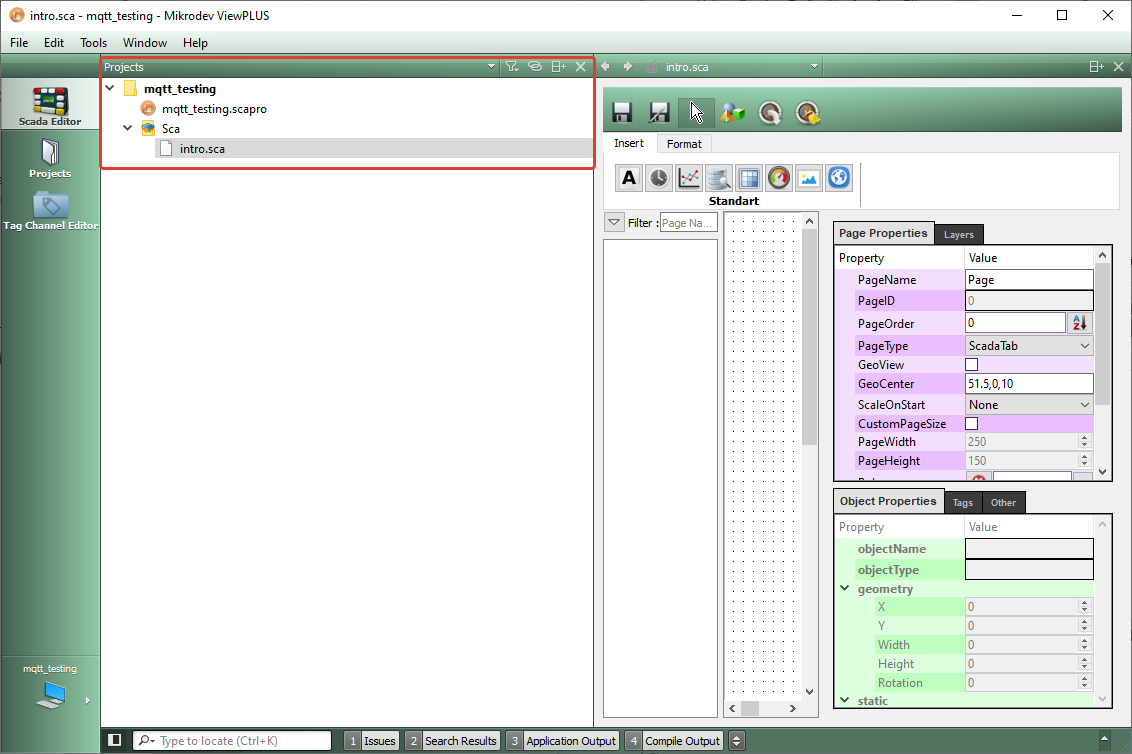
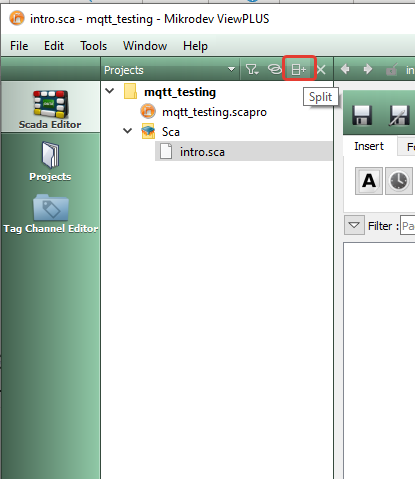
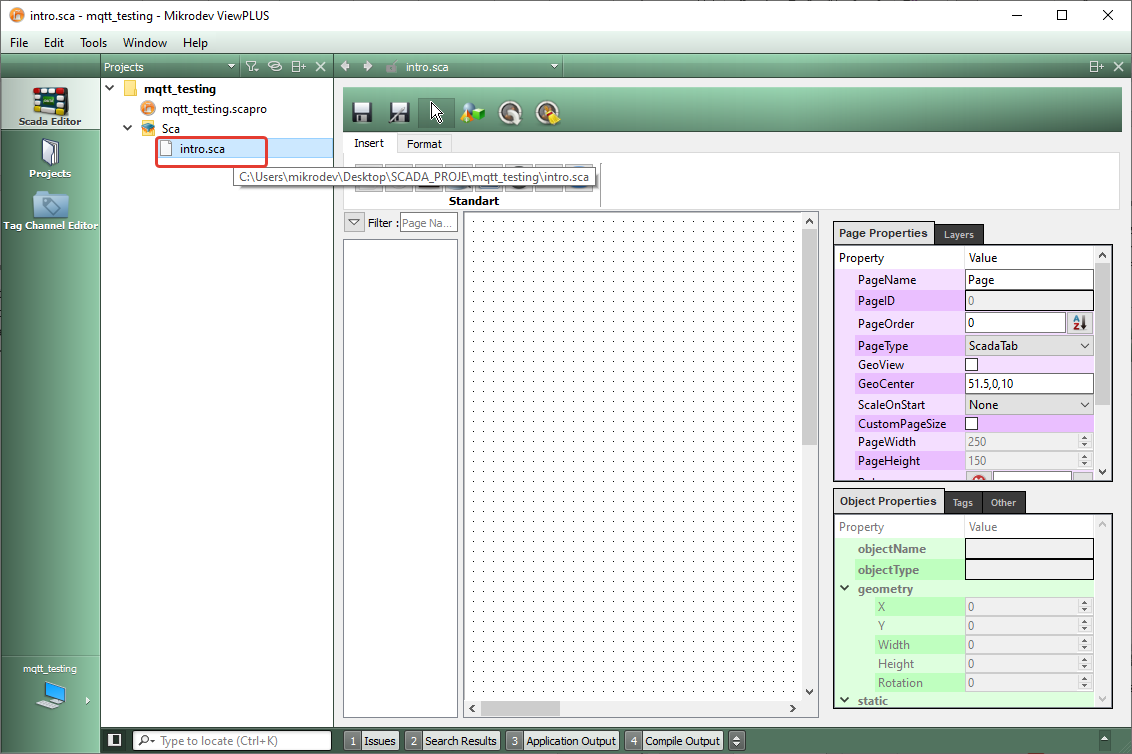
Click on the arrow next to the "Sca" text under the project name. Here, you will find the "intro.sca" expression. This file is the default SCADA page that comes with every project where we design SCADA screens. Hover over the "intro.sca" expression and double-click it. After this process, a letterhead paper will open on the right side.

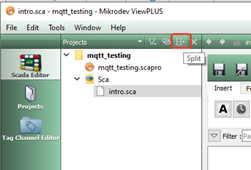
Click on the split panel icon next to the "Projects" text in order to split the panel and be able to add the SCADA component to the page.
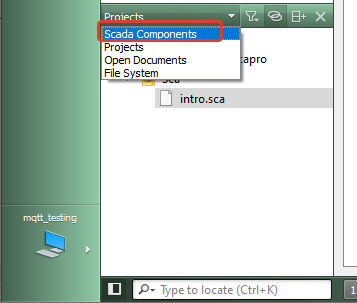
A second "Projects" text will appear on the left side. Click on the "Projects" text and select the "SCADA Components" option.
Find the "Display" category within the SCADA components and click on any display component.

Drag and drop the selected display component onto any point of the letterhead paper located on the right side.
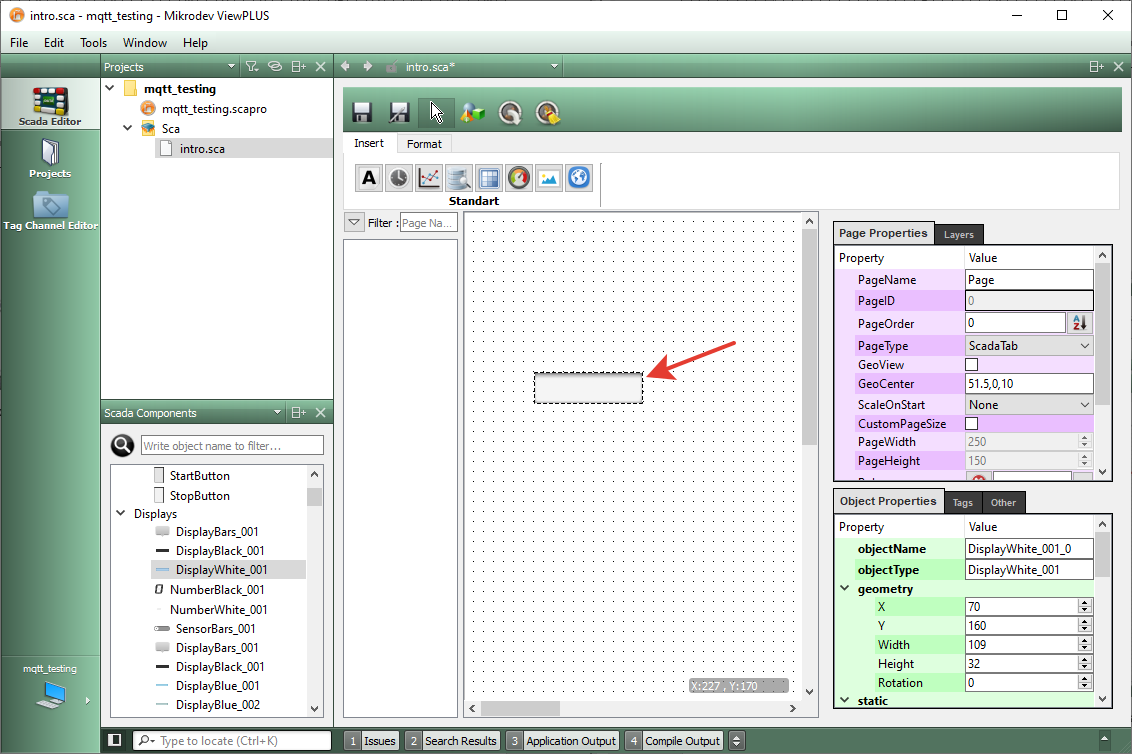
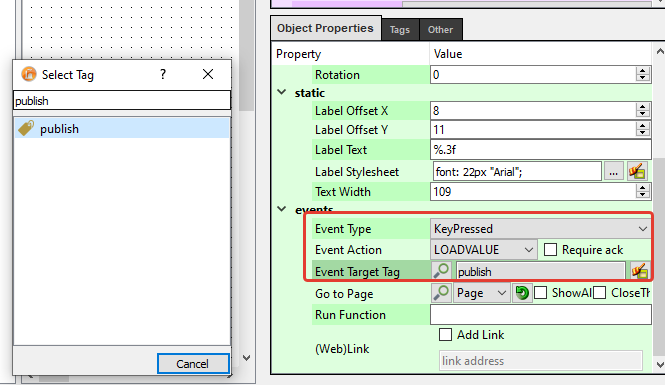
Find the "Events" expression in the object properties section on the right side.
Event Type: Select "Key Pressed" to be able to enter a value from the keyboard.
Event Action: Choose "Set Value" here.
Event Target Tag: Select the tag we prepared in the MQTT channel in this section. To select a tag, click on the magnifying glass icon next to the "Target Event Tag" text.
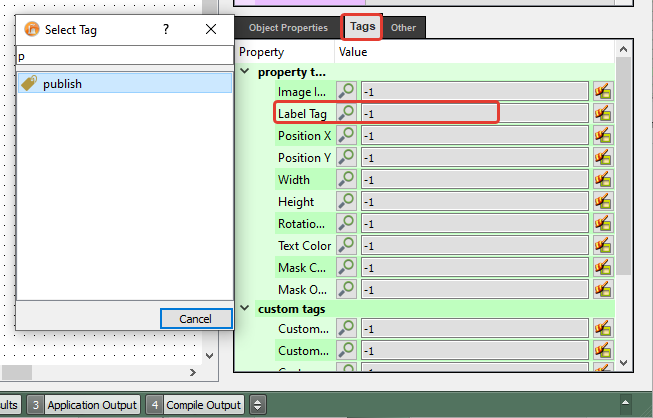
To be able to see the entered value on the display, the same tag should be entered in the "Tags" section of the Labels section.
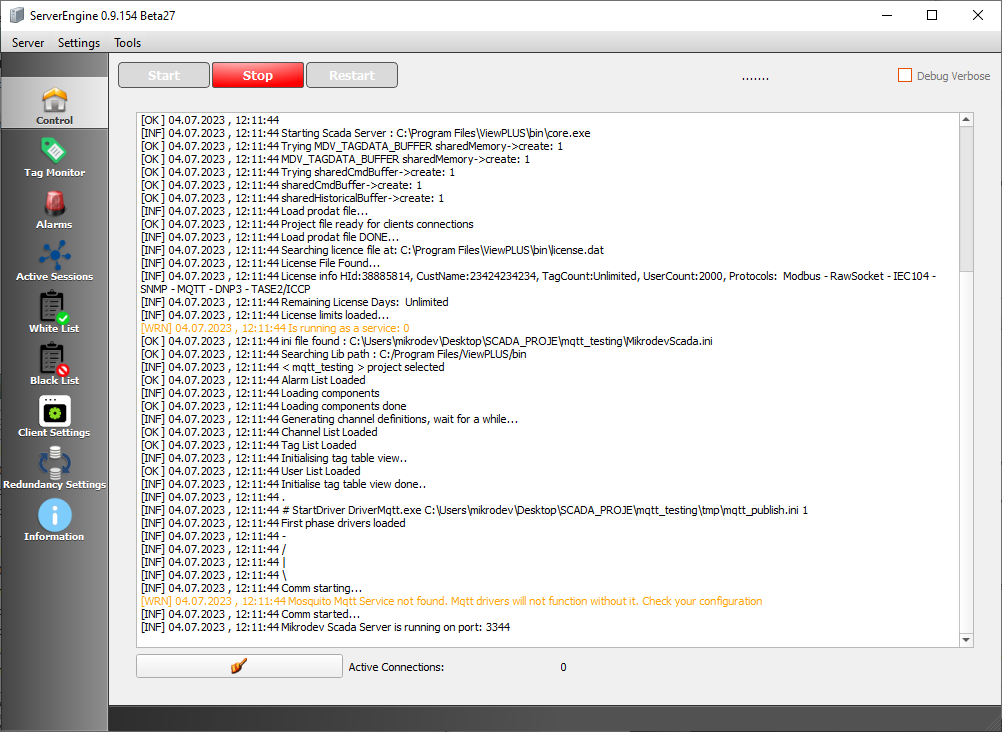
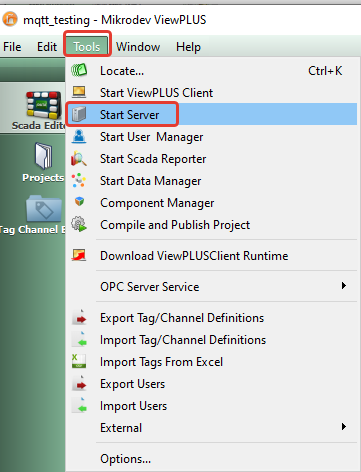
Before starting the server, save and close all the edited screens, and make sure that the MQTT broker is running on your computer (Mosquitto.exe should be running).
Go to "Tools" -> "Start Server" to start the server.

When selecting the "Start Server" option for the first time in the project, the Database Settings screen will appear. Enter the password you created during the PostgreSQL installation in the "Database User Password" field and click on the "Test Connection" button.
You will see that the server program is running.
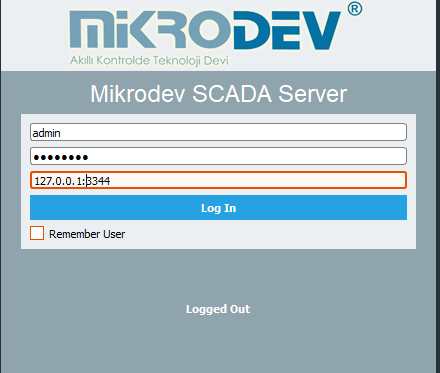
Click on "Tools -> Start ViewPLUS Client" option. The default login credentials for the client are as follows:
Username: admin
Password: mikrodev
Server Address: 127.0.0.1:3344

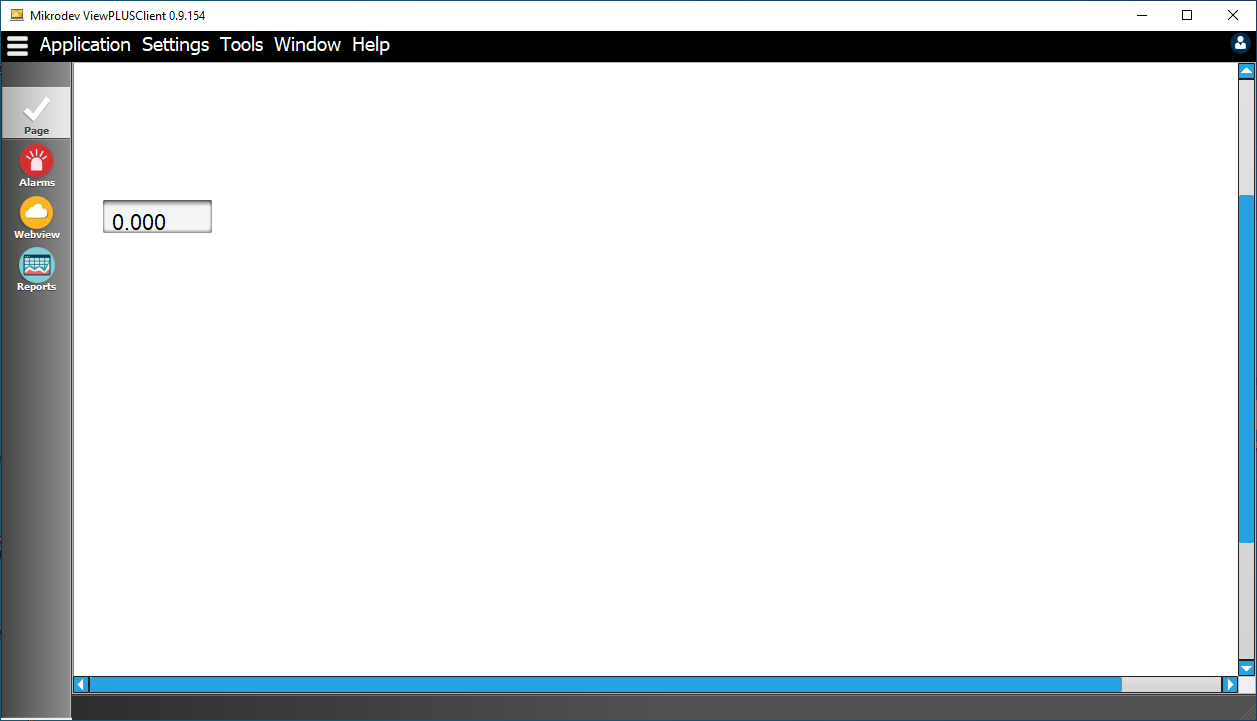
Once you have entered the above information and clicked on the "Login" button, you will see the designed page appear on the screen. To send a value via the display, hover over the display and right-click. Click on the "Set Value" option.

Enter the desired value in the opened window and click "OK".

To view the published values, you can use the MQTT Box program.
Open the MQTT Box application. Click on "Create MQTT Client".

MQTT Client Name: Provide a name for your client.
Protocol: Select "mqtt/tcp."
Host: Since the broker is running on your local computer, enter "127.0.0.1:1883."
Click on "Save."

You can verify that the connection to the broker is established by checking the "connected" message on the screen.

To view the values published by the SCADA, you can use the "Topic to subscribe" field or the "Add Subscriber" option located at the top.
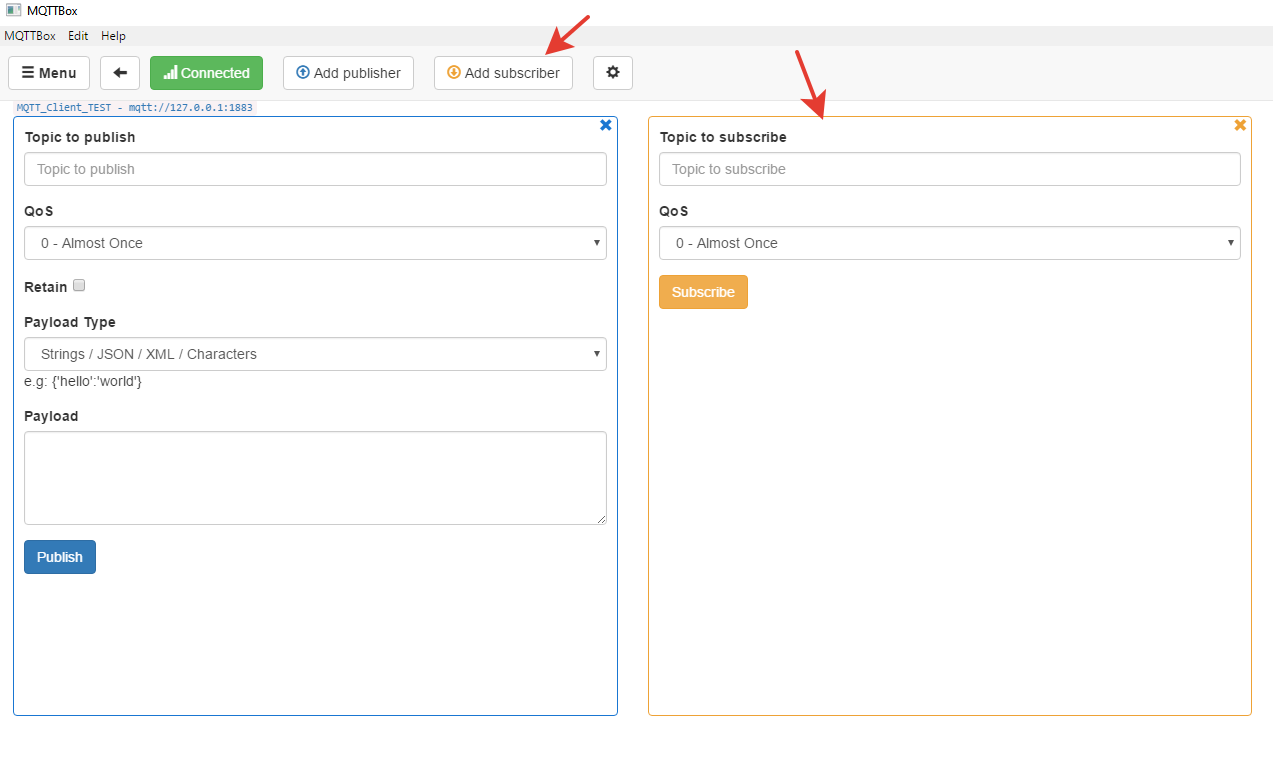
Enter the topic name that was created in the SCADA editor for publishing, and click on the "Subscribe" button. Make sure that QoS 0 is selected.

Monitor the values sent from the client in the MQTT Box application.
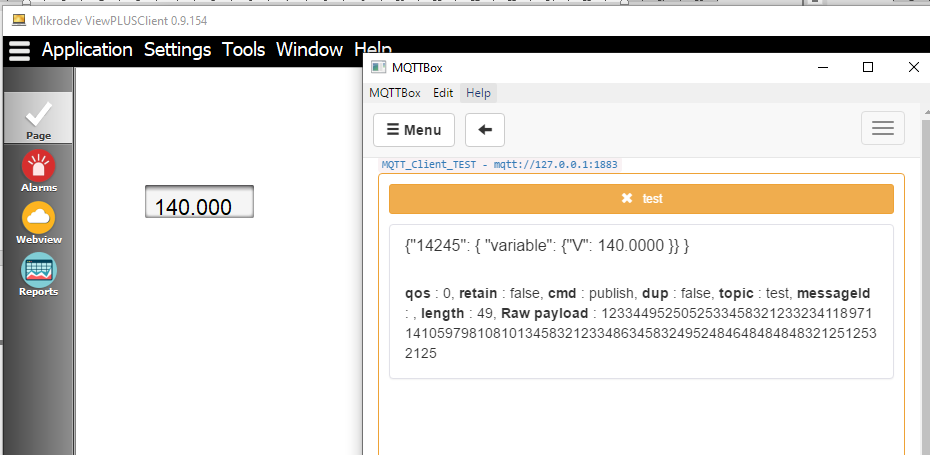
The payload structure for the value published by the SCADA system is:
{"14245": { "variable": {"V": 140.0000 }}}
In this structure, the value "14245" represents the equipment number entered in the tag definitions.
Note: If the equipment number field is left empty in the tag definitions, the payload structure of the value will be: {"": { "variable": {"V": 140.0000 }}}
In this structure, the "variable" expression represents the variable name entered in the tag definitions,
"V: 140.0000" represents the published value.
Subscribing to a Value in Scada
Equipment: Device ID information is entered here. (This field can be left blank.)
Topic: The topic for publishing is entered in this field.
Sub/Pub: The selection for Publish, Subscribe, or both is made here. Since we are discussing value subscribing under this topic, the Subscribe option should be selected.
Variable Name: The variable name is written here. The variable name mentioned here refers to the tag name of the label in the PLC project.
Variable Type: The variable type is selected here. ViewPLUS SCADA only supports BOOL and DBL variable types.
VarSize: The SCADA program automatically assigns the variable size based on the variable type.
Note: The ViewPLUS SCADA editor supports two different variable types as tag types. These are Boolean and Double data types.
Example of Subscribing to a Value from Scada
Note: In this example, simulation will be done using the MQTT Box program.
Click here to download the MQTT Box program for Windows.
Open the ViewPLUS SCADA editor. Click on File -> New File or Project. Create a new project.
From the opened screen, select Projects -> Applications and click on the "Select" text located at the bottom right corner.
From the opened screen, select the project name and choose the file location where the project file will be saved. Click on "Next."
Enter the password you set during the PostgreSQL installation in the "Database User Password" section of the database settings, and click on "Test Connection." If you entered the password correctly, the screen will display "Ok." Once you see "Ok," click on "Next."
You can adjust the SCADA design page settings from the View Settings page. This can also be done after creating the project. After making the adjustments, click on "Next."
The Summary screen displays general information about the project. After clicking on "Finish," a new project will be created.
The connection between the newly created project and the database is checked from the information screen that appears on the screen.
The newly created project name will appear under the Projects section.
To subscribe to a value published using the MQTT Client channel in Scada, first open the Tag Channel Editor.
Right-click on the "None" expression and select the "New Channel" option.
Enter the channel name in the popup screen, and select the "MQTT_CLIENT" option from the protocol type section. Click on "Ok."

Configure the channel settings as described in Figure 2.
To add a new tag under this created channel, hover over the prepared MQTT channel and right-click. Click on the "New Tag" option.
In the popup screen, enter a new tag name and click on "Ok."

To view the created tag under the channel, click on the arrow button located on the left side of the channel name. Here, you will find the tags under the channel. Click on the prepared tag.
According to Section 2.1.1, make the tag definitions. Press CTRL + S to save the changes or click on the "Save Tag Data" text located at the bottom of the tag screen. When the changes are saved, the exclamation mark symbol that appears on the left side of the tag name will disappear.

To monitor the subscribed value through the Scada program, a display component needs to be added to the Scada page.
To add a display component to the Scada page, click on the "Scada Editor" on the left side.
Click on the arrow next to the "Sca" text under the project name. Here, you will find the "intro.sca" expression. This file is the default SCADA page that comes with every project where we design SCADA screens. Hover over the "intro.sca" expression and double-click it. After this process, a letterhead paper will open on the right side.
Click on the split panel icon next to the "Projects" text in order to split the panel and be able to add the SCADA component to the page.
A second "Projects" text will appear on the left side. Click on the "Projects" text and select the "SCADA Components" option.

Find the "Display" category within the SCADA components and click on any display component.
Drag and drop the selected display component onto any point of the letterhead paper located on the right side.

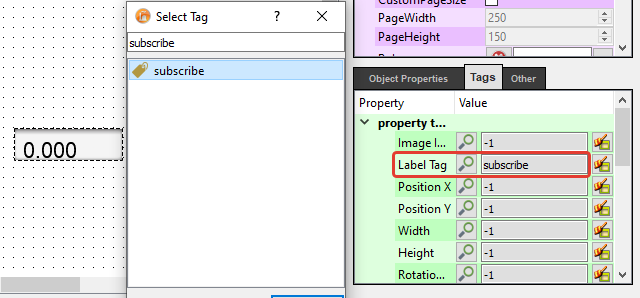
To track the subscribed value through this display, enter the prepared tag in the "Label Tag" field in the Labels section of the display.
Before starting the server, save and close all the edited screens, and make sure that the MQTT broker is running on your computer (Mosquitto.exe should be running).
Go to "Tools" -> "Start Server" to start the server.
When selecting the "Start Server" option for the first time in the project, the Database Settings screen will appear. Enter the password you created during the PostgreSQL installation in the "Database User Password" field and click on the "Test Connection" button.
You will see that the server program is running.

Click on "Tools -> Start ViewPLUS Client" option. The default login credentials for the client are as follows:
Username: admin
Password: mikrodev
Server Address: 127.0.0.1:3344
When you click on the "Log In" button after entering the above information, you will see that the page we designed is displayed on the screen.
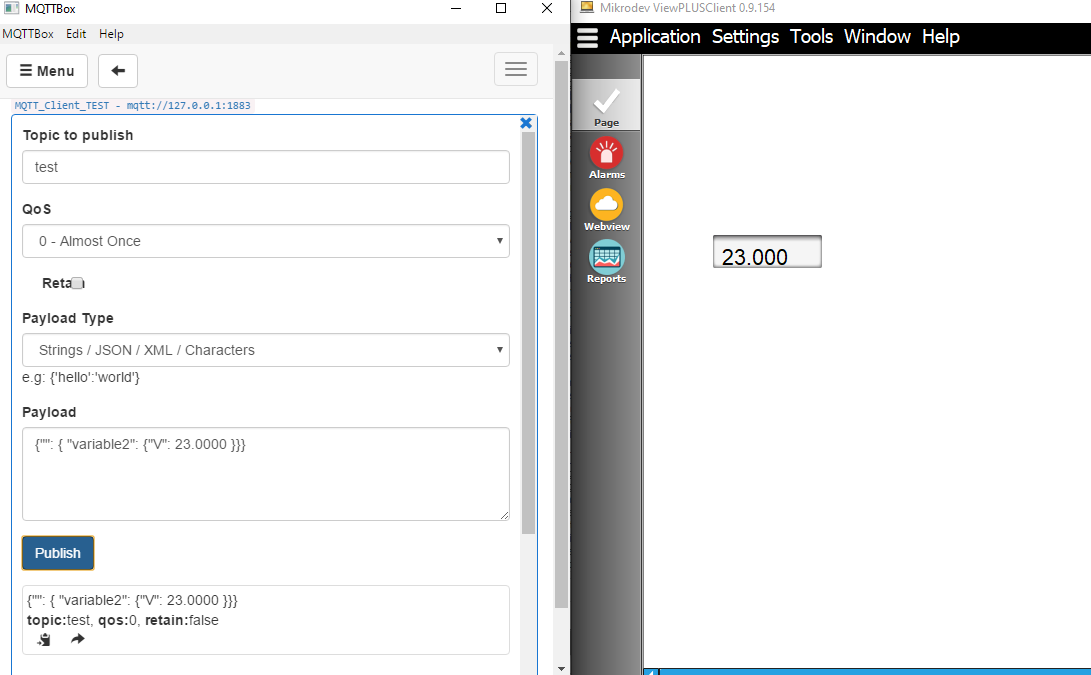
In this application, the subscribed values can be published using the MQTT Box program.
Open the MQTT Box application. Click on "Create MQTT Client".
MQTT Client Name: Provide a name for your client.
Protocol: Select "mqtt/tcp."
Host: Since the broker is running on your local computer, enter "127.0.0.1:1883."
Click on "Save."

You can verify that the connection to the broker is established by checking the "connected" message on the screen.
To publish values to the SCADA system, you can use the "Topic to publish" field or the "Add Publisher" option located at the top.
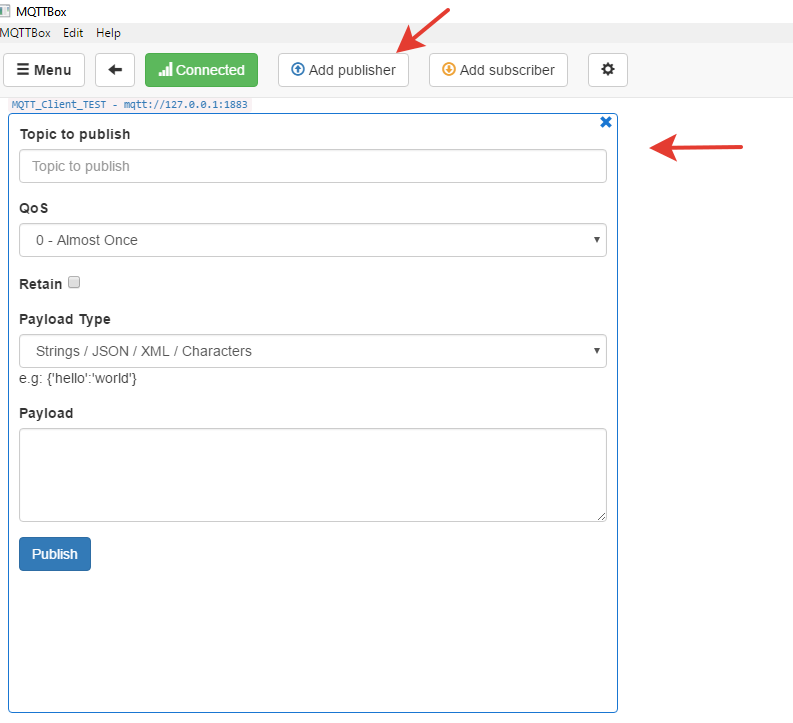
To publish values to the SCADA system, follow these steps:
In the "Topic to publish" field, enter the subscribed topic from the SCADA editor.
Set the QoS value to 0.
Select the "Strings / JSON / XML / Characters" option for the Payload Type.
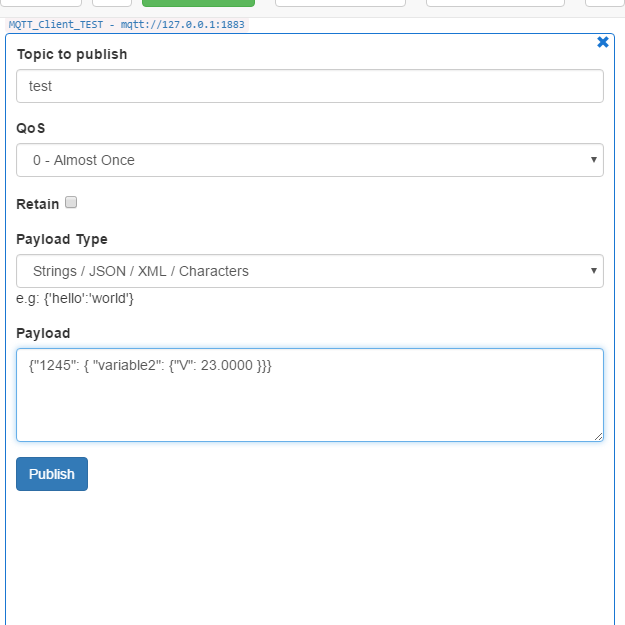
The payload structure should be in the format: {"1245": { "variable2": {"V": 23.0000 }} }.
The value "1245" represents the equipment number entered in the SCADA editor.
The value "variable2" represents the variable name entered in the SCADA editor.
The value "V: 23.0000" represents the value being published to the tag.
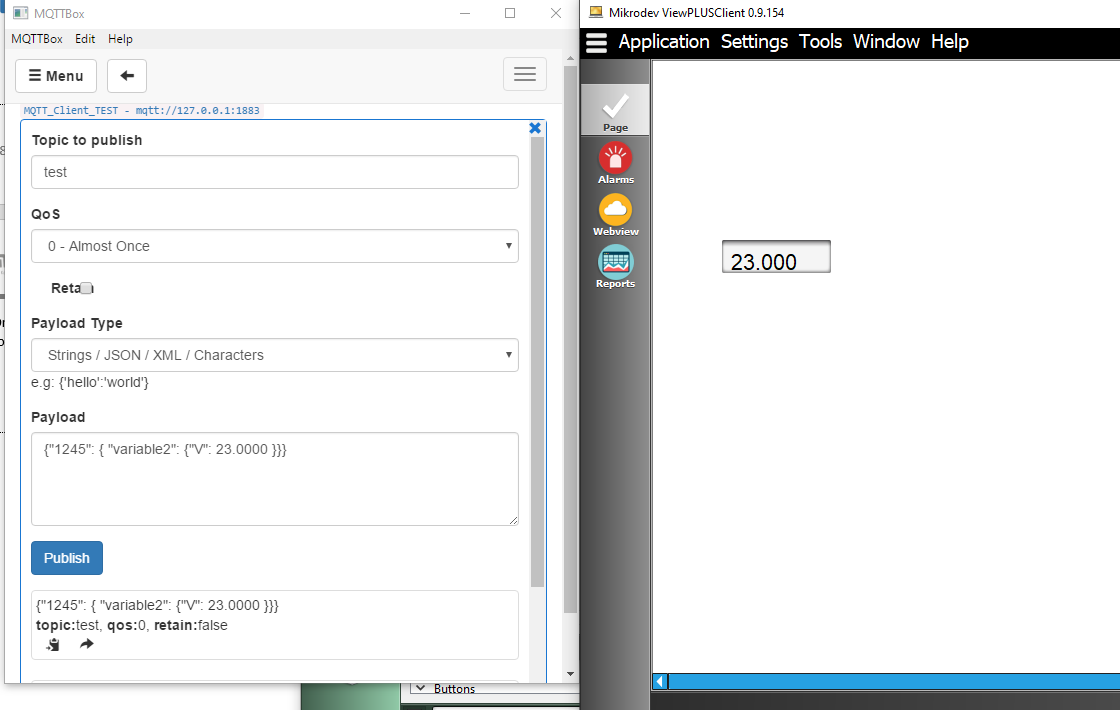
Once you have entered the values as described and clicked on the "Publish" button, you will be able to see the published values on the display in the ViewPLUS Client screen.
Note: If you want to subscribe to a value in the SCADA without entering an equipment number, the example payload structure should be: {"": { "termometre1": {"V": 23.0000 }} }.